

[GM] Razgrom
-
Posts
374 -
Joined
-
Last visited
-
Days Won
31
Content Type
Profiles
Forums
Articles
Blogs
Calendar
Posts posted by [GM] Razgrom
-
-
In your personal account you can find feedback. We have a cool ticket system where we will answer you soon.
No need to create a million topics on the forum, leave all the questions in the chat support !

-
1. After replenishing the balance, click the Shop -> Credits Shop tab and choose the product we are interested in.
- Additional services have also appeared Shop -> Services
????? ???? ??? ????????? ????, ??????? ? ??????? ? ???????? ???????? ? ???????.


2. Next, proceed to the checkout and purchase item!
????? ??????? ??? ???????? ? ????????? ? ???????.

3. Receiving goods in the game. Select items from the list. You just need to enter the number in front of the item and its quantity.
??????? ? ????, ???????? ???????? ?? ??????.
-
 1
1
-
-
1. ?ash points available for events or exchange donations credits for cash.
2. Cash points can be spent on the purchase of consumables or headgears.


-
1
-
-
1. Lets go to Special Vending Machine ( malangdo 218 165). Buy an Octopus Hunting Spear there. You need Silvervine Fruits for them Silvervine Fruit
 (1 x Fruit = 10 Event points)
2. Talk to the Starfish.
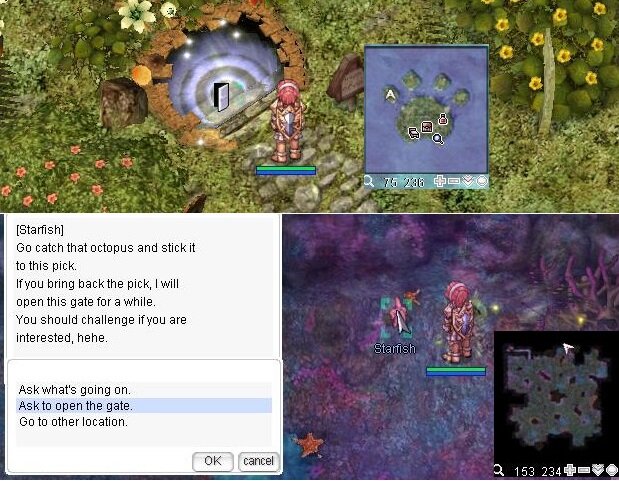
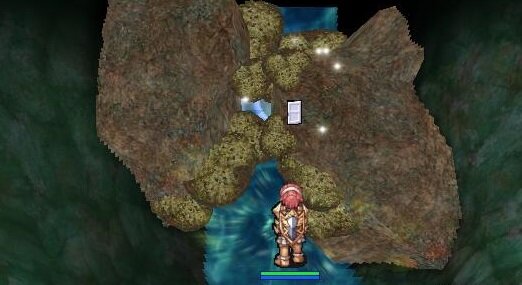
3. You'll be warped into a cave with 4 warp portals. Enter one of the portal and walk until the end of the tunnel. There is no need to kill everything and the order of the portals don't matter. Kill the Octopus Leg.

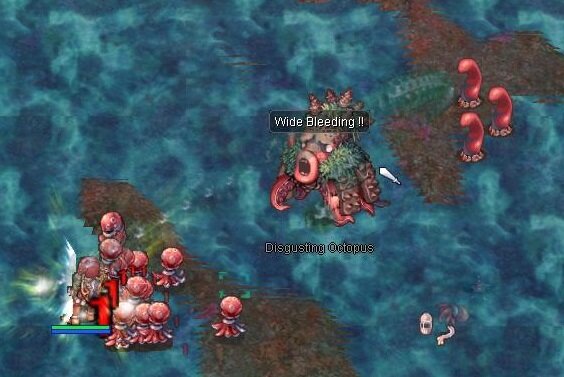
4. After killing 4 Legs, you'll be teleported back. Prepare for the boss fight.
5. There will be the Disgusting Octopus (MVP), Octopus Legs and Octopuses.
-
Lets go to Special Vending Machine ( malangdo 218 165). Buy an Seagod's Protection there. You need Silvervine Fruits for them Silvervine Fruit

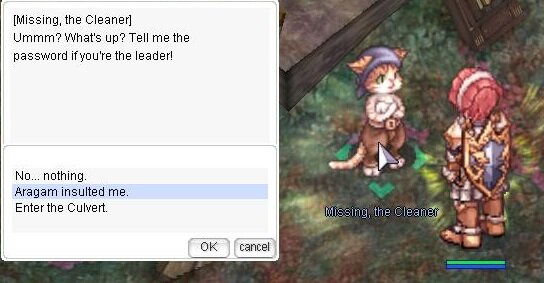
1. Talk to Missing, the Cleaner.
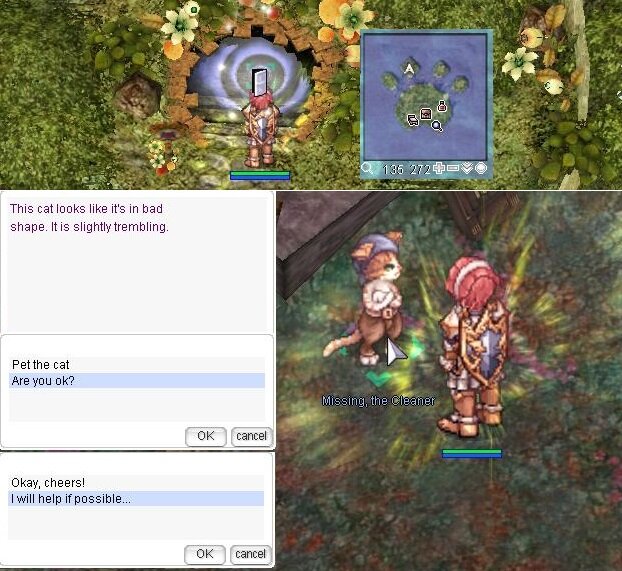
2. Talk to Albo and take the quests. (General for Normal mode, Hard for Hard mode.)
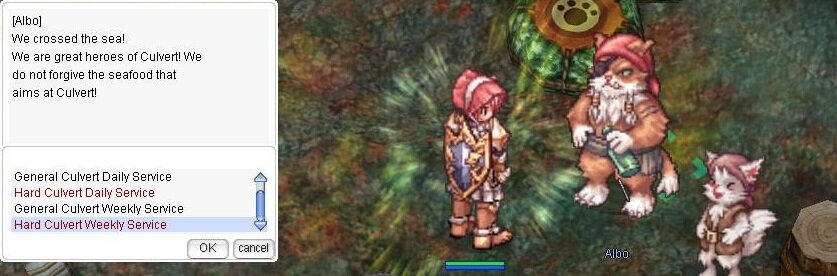
3.Talk to Missing, the Cleaner again with the Seagod Protection in your inventory.
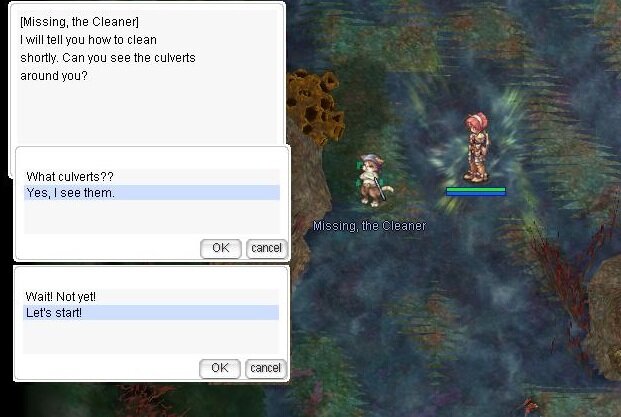
4. You'll get warped into a room. Talk to Missing, the Cleaner.
- Choose I'm pretty good at delivering bread for Normal mode.
Gloomy Coelacanth or Weird Coelacanth + Coelacanth
- Choose I know how to fight. for Hard mode.
Violent Coelacanth or Mutant Coelacanth
Inside the Instance
5. In the next area(warp) talk Missing, the Cleaner.
6. To there will be an announcement whenever a drain appears.
- At the drain, a group of aggressive monsters appear.

7. The drain will shine in a big, blue light. Click on it to deactivate them. (Getting hit will cancel the process.)
- If you can't kill the monsters in time, the drain will close and a Contaminated Stem appears.
- If 6 Stems are present, the party will be kicked out.


8. Repeat the process until the following message appears:

9. Soon after this announcement, the MVP starts around the center.
10. Upon defeating the boss, random loot appears around the room. Be sure to grab them before leaving the instance!
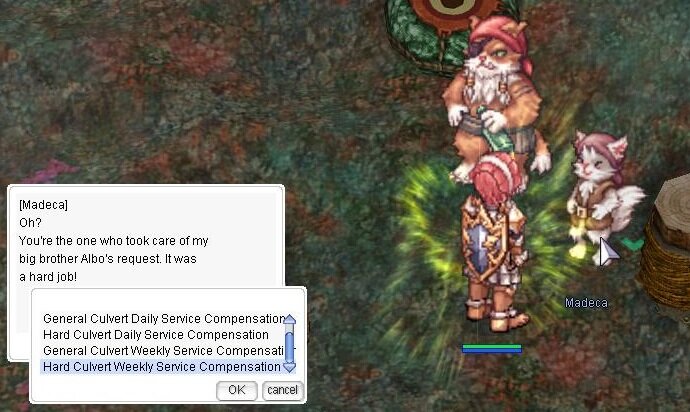
11. Leave the instance and talk to Madeca to receive the reward for your quests.
-
1. At the entrance, speak with the Guard to create an instance for your party.
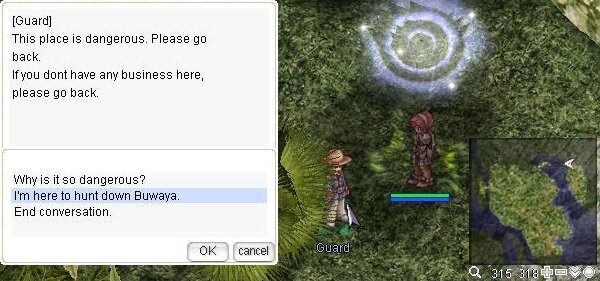
2. Look around the cave for the real Buwaya.
- There are also fake Buwaya's that look and are named just like the real MVP, but they are a lot weaker and die fast. If you come close to a fake one, you will be warped into its treasure box and poisoned.
- You also seem to get warped there randomly by chance.
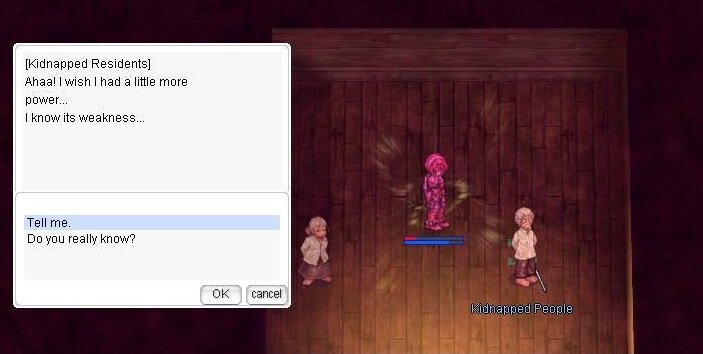
3. Speak to the Kidnapped People to spawn two Buwaya's Weaknesses that must be defeated within a a short time period to leave the box. If you can't win Buwaya's Weaknesses several times, the dungeon will fail!
- These are plant type, meaning they only take one damage per hit. Once both are defeated, a portal appears at the top of the map that warps you back into the cave.

4. Find the real Buwaya and get some hits off before the cycle repeats.
5. Speaking to the old man inside the box will give you ATK & MATK buffs.
6. After killing the Buwaya, leave the dungeon.
-
Main Malaya quest for all quests. Cautious Village
1. Talk to Rodel the Guard.

2. Talk to Leader Phong in Mumbaki.
- Select either of the choices and he will be amazed how the ghosts are threatened by your presence.
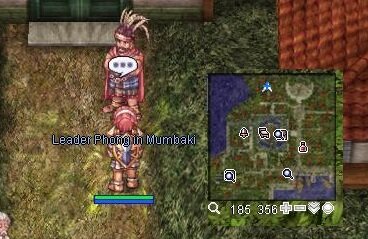
3. Talk to Old Man Nardo

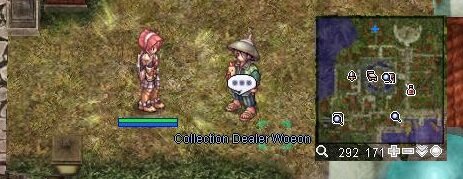
4.Talk to Collection Dealer Woeon
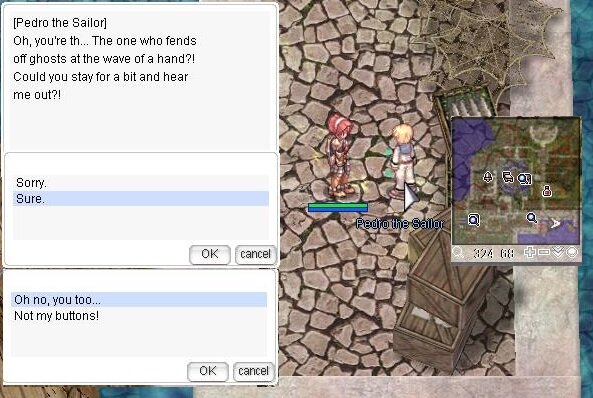
5. Talk to Pedro the Sailor
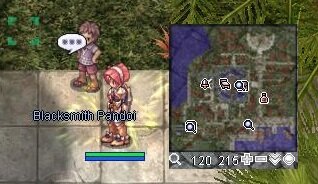
6. Talk to Blacksmith Pandoi
7. Talk to Talah and Romel

8. Return to Leader Phong in Mumbaki. Gather the required items and deliver them to the people you spoke with earlier (in any order).
-
6 x
 Holy Water + 6 x
  Blue Gemstone
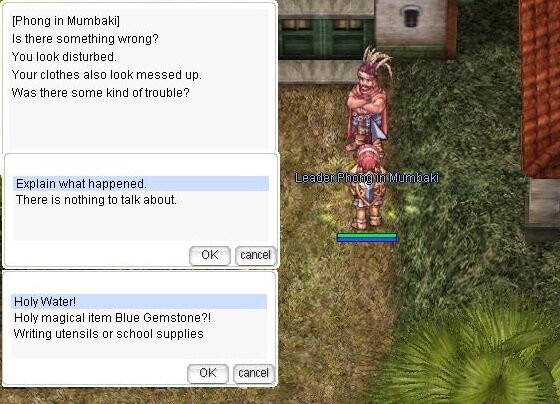
9. Return to Leader Phong in Mumbaki, receive 1 000 000 Base / Job Exp and now you can start the daily quests and speak with most of the NPC's in Port Malaya.
Get rid of Bakonawa (120+ LvL)
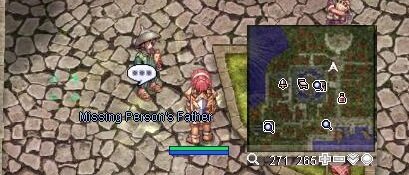
1. Talk to Village Chief. He tells the you that Tiyanaks carries those belongings and asks the you to retrieve 2 x Lost Belongings from Tiyanak and take them to the Missing Person's Father
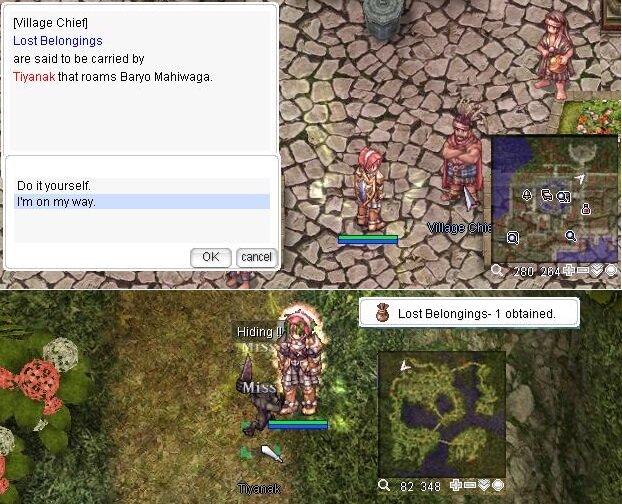
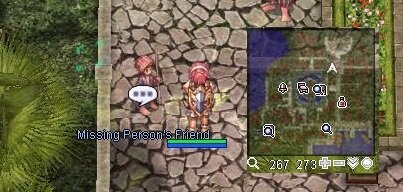
2. Talk to Missing Person's Father. He tells the player that the lost belongings belong tot . He then asks the player to get 7 x Lost Belongings and bring them to the Missing Person's Friend.
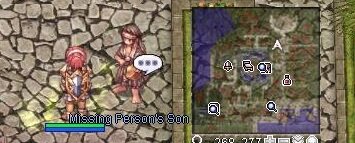
3. Talk to Missing Person's Friend. He asks you to get 3 x Lost Belongings and deliver them to the Missing Person's Son
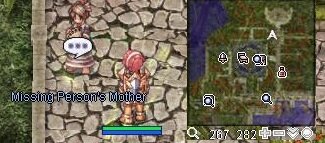
4. Talk to Missing Person's Son. He asks you to bring 5 x Lost Belonging to the Missing Person's Mother.
5. Talk to Missing Person's Mother. She'll tell you that it's her child's hair comb. Return to the Village Chief.
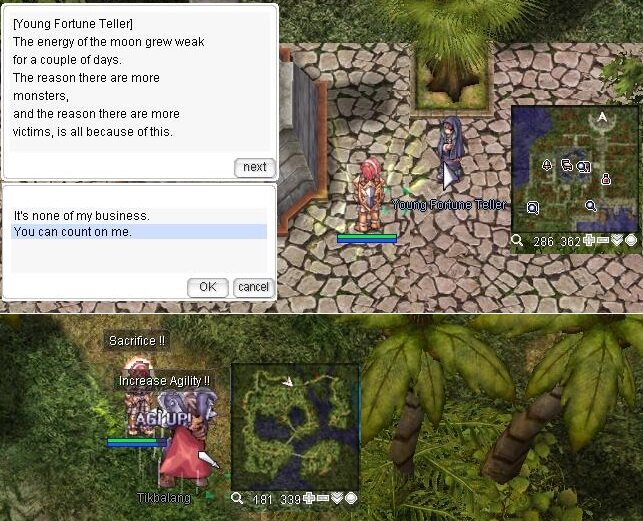
6. Talk to Village Chief. He tells the you that the Young Fortune Teller seeks for their help.

7. Talk to Young Fortune Teller. She needs to sacrifice a monster's blood. She asks you to hunt 15 x Tikbalang.
After killing Tikbalangs, return to her and she'll give you

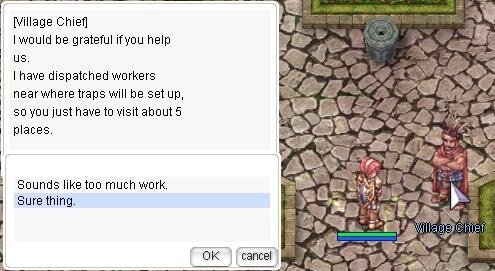
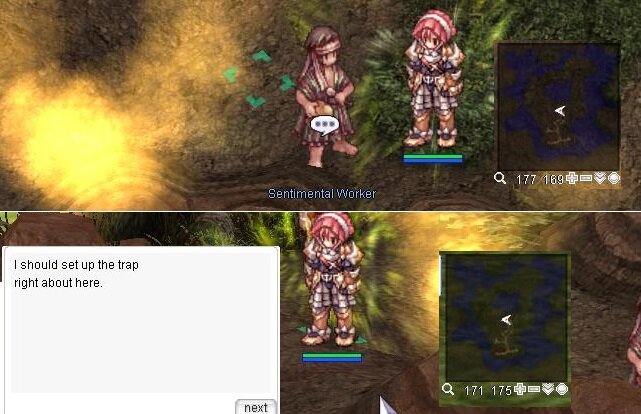
8. Speak with the Village Chief again. He tells the you that he never know when the Bakonawa will attack the village. In preparation, he asks you to help set traps near the village & lake entrance.
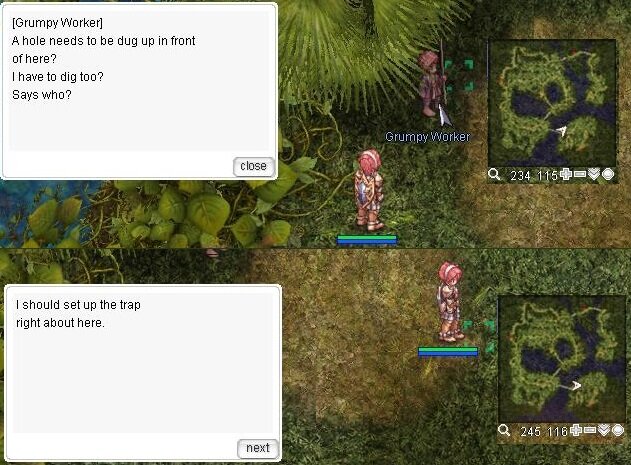
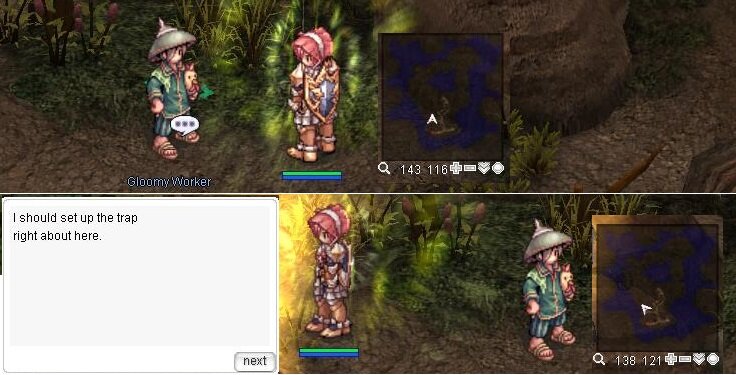
Just walk near these NPC's and a dialog will pop-out. Set the traps in the following order.
First trap

Second trap
Third Trap

Fourth Trap
Fifth Trap
9. Return to Village Chief. Receive Receive 5 000 000 Base Exp + 3 000 000 Job exp + 7 x Lesser Agimat

Final Boss Bakonawa!
1. Talk to Taho.
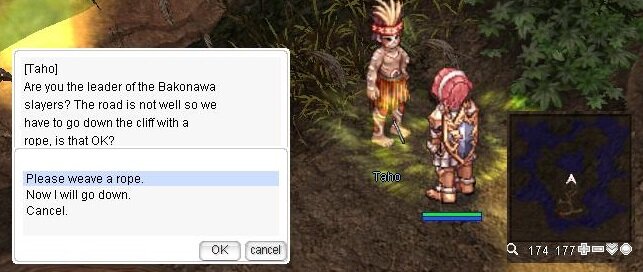
2. Talk to Taho inside instance.
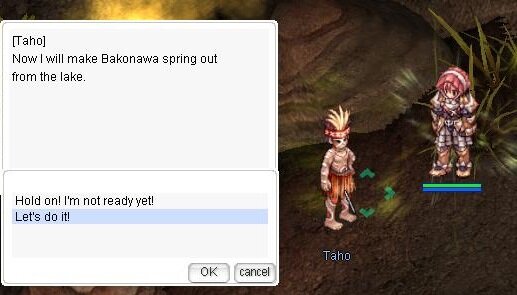
Phase 1: Bakonawa appears inside the lake. In this phase, Meteor Storms shower down, but other than that very few skills are used and it should be easy to defeat him. There is a 10 minute time limit for this Phase.
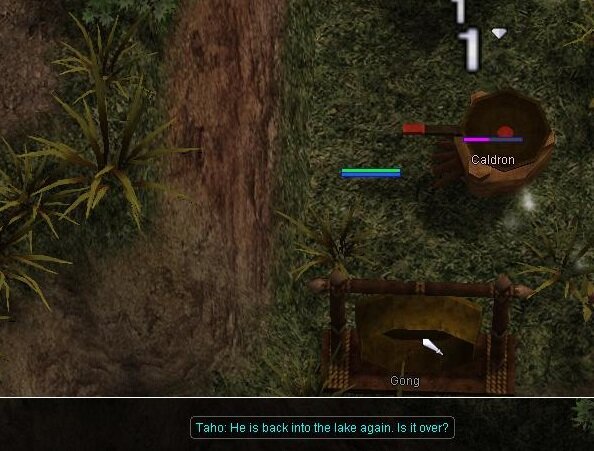
Phase 2: When he is defeated, he will move further into the lake and try to swallow the moon. You must make noise by defeating the 4 Instruments that appear. These are plant type, meaning they take only one damage per hit, and seem to have around 200 HP. While you are attacking these, Meteor Storms / LoV /Storm Gust / Bolts will continue raining down on your party. There is a 5 minute time limit for this Phase.
Phase 3: Enraged Bakonawa appears near the lake again and you must defeat him. As before, Meteor Storms rain down, but he now uses other skills such as Storm Gust, Lord of Vermillion and Break Weapon. As he grows weaker, waves of minions will be summoned every two minutes, about 15 each wave. These are stronger than the normal monsters around Malaya.
When he dies, a Treasure Box is spawned to the south of the lake that contains the loot.

3. Talk to Taho. Receive 500 000 Job exp + 7 x Ancient Grudge

-
Quest Prerequisite(s): Cautious Village
Nurse at Port Malaya
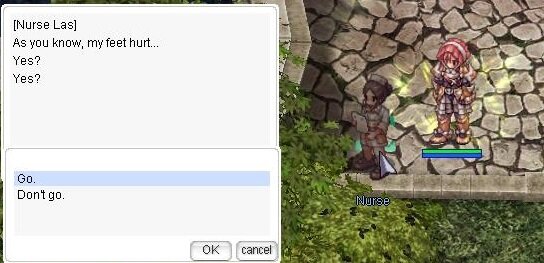
1. Talk to Nurse. She asks you if you could take her with you. Because her legs are hurt and having blisters, she asks if you could give her 2 x Rotten Bandages to wrap them. Hand over her the bandages. Talk to her again. click on the Hospital Door.
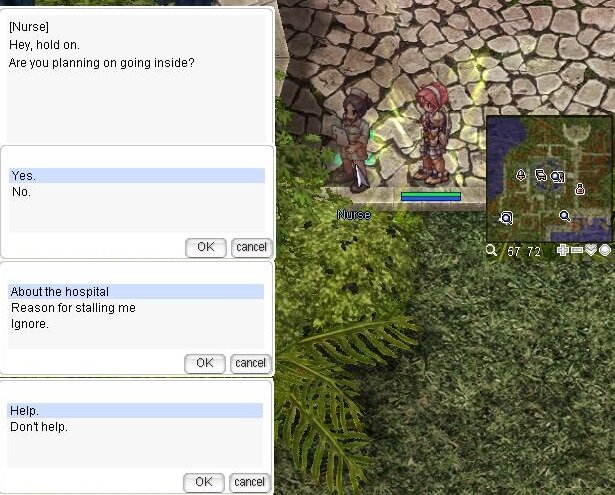
2. Click on the Hospital Door. Talk to Nurse again. She then asks you to to speak with the townsfolk while she contact the headquarters.
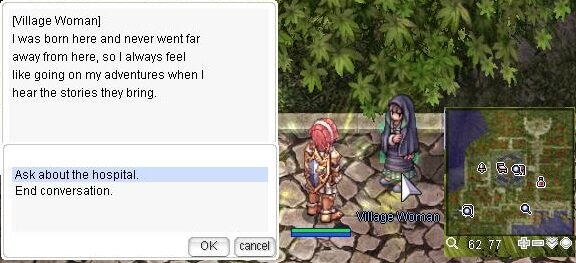
3. Talk to Village Woman.
4. Return to Nurse.
5. Talk to Village Man.

6. Return to Nurse.
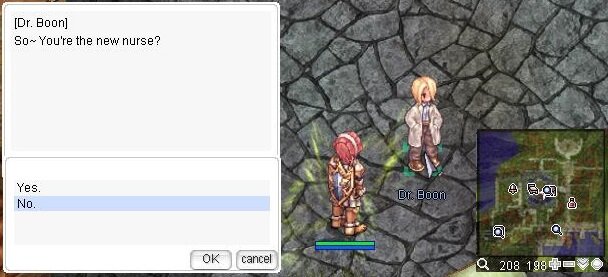
7. Talk to Dr. Boon
8. Return to Nurse.
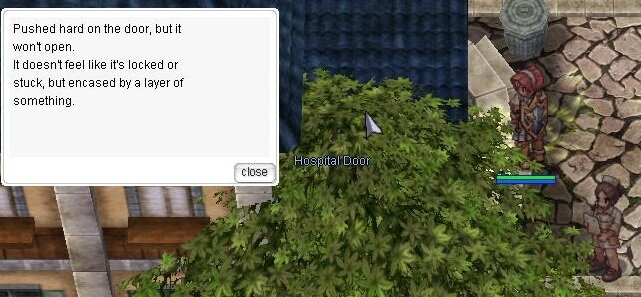
9. As you try to unlock the door again, it appeared as if it is not locked but it still won't open.
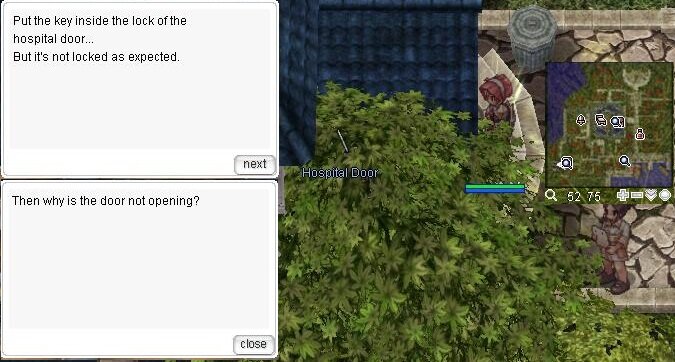
10. Talk to Nurse.
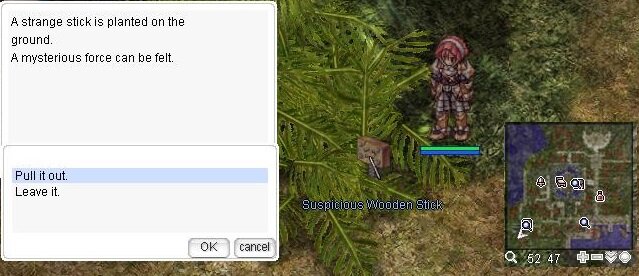
11. Investigate the Bushes

12. Pull out the Suspicious Wooden Stick scattered around the hospital until you obtain 2-3 Lesser Agimat
 .
.
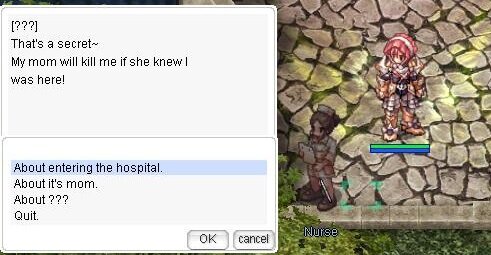
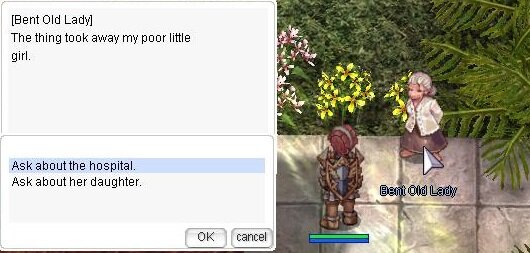
13. Return to Nurse. She suggests you to give the old lady a visit.
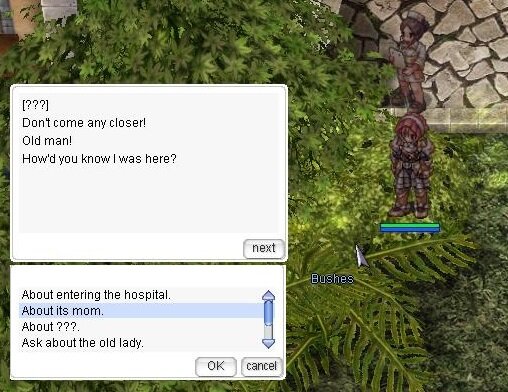
14. Talk to Bent Old Lady, show her the stick you pulled out from the hospital and she screams angrily because you took away the talisman to stop the wicked thing. You realize that Nurse Las could be in danger standing in front of hospital and you decide to go back quickly.
15. Return to Nurse. She tells you that while you are gone she accidentally opened the door.
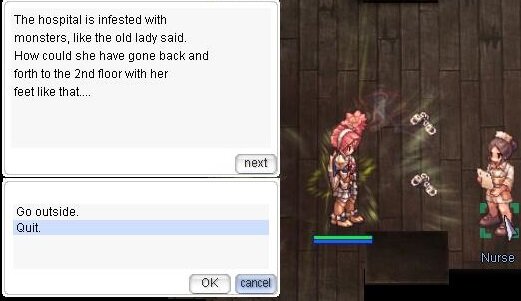
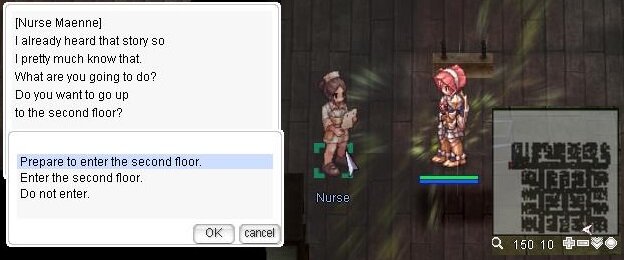
16. Enter the hospital. She asks you to go check the entrance of the 2nd floor of the hospital.
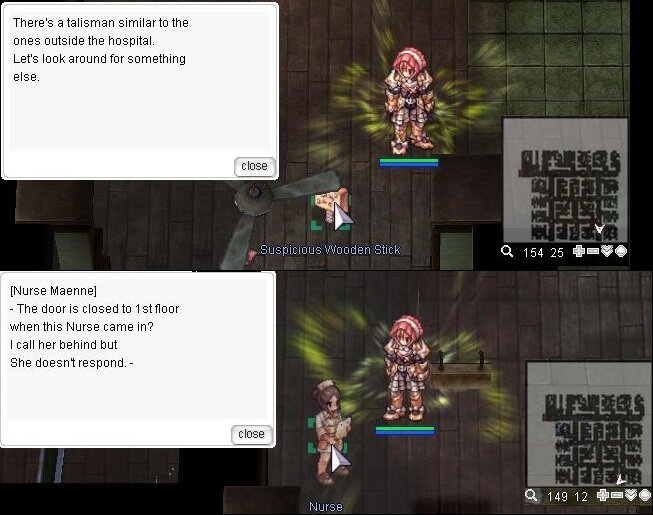
17. Near the entrance to the 2nd floor near the SE corner of the map, click on the strange stick and speak with Nurse Maenne. You decide to tell Nurse about what you saw.
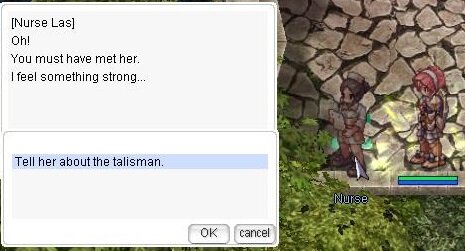
18. Return to Nurse. She suggests you to consult the Bent Old Lady about the talisman.
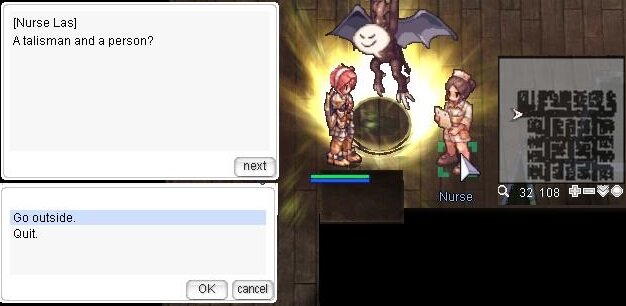
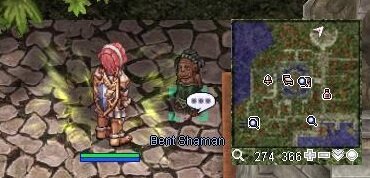
19. Talk to Bent Old Lady.
20. Talk to Shaman.
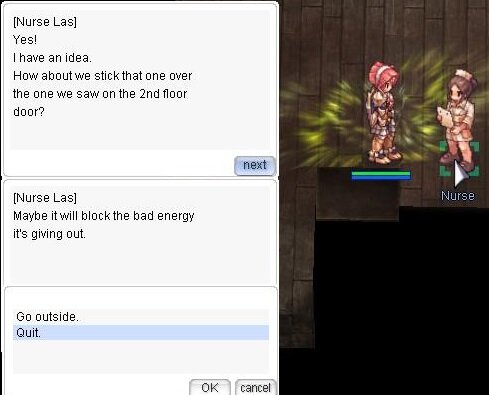
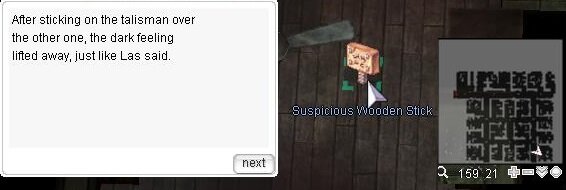
21. Return to Nurse. She tells you that she felt something strong and asks how about you stick it over the one you saw near the 2nd floor entrance to block the bad energy.
22. Return to the 2nd floor entrance and stick the new talisman over the old one. After sticking it in, you felt the dark energy being lifted away.
23. At this point, it seems you have been fooled by Nurse to do something about the talismans and she seemed happy about it.
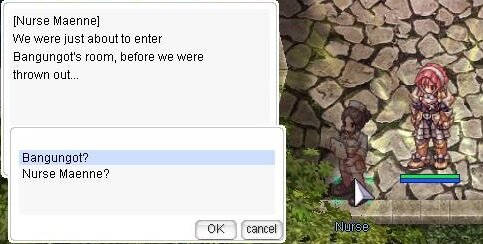
- With the talismans on your possession she can't take you with her in her room. You will be warped back at the entrance.
24. Speak with Nurse at the entrance and she tells you that both of you were about to enter Bangungot's Room. Ask her about Bangungot and Nurse Maenne, listen to the explanation. You discover that Nurse Maenne is the new nurse the village is talking about and found that Bangungot pretended to be her.
25. After the conversation, you will receive 5 x Ancient Grudge
 , 10 x Lesser Agimat
 , 1 Old Purple Box
 .
.
26. Now, you have Bangungot Hospital Access and Bangungot's Instance.
Bangungot's Instance
1. Talk to Nurse.
Phase 1:
- In each of the patient rooms, kill all monsters that spawn.
Phase 2:
- Fight against Bangungot(MVP)

- If Bangungot dies, advance to Phase 3.
But If Bangungot doesnt't dies, he goes into a protective state.
You will need to return to the room with the patients and kill the monsters.

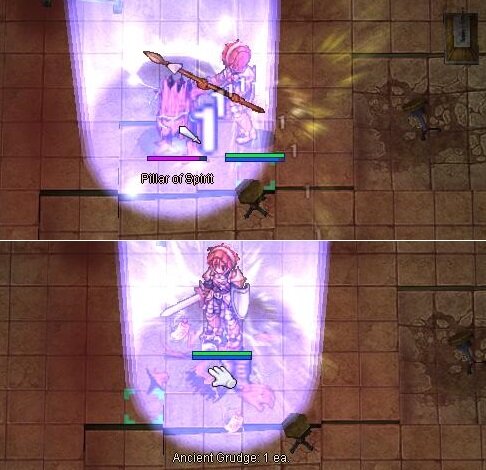
Phase 3:
- To eliminate it completely, you must defeat the Pillar of Spirit for 1min.
- The Pillar of Spirit has a max HP of 250 with 1 damage taken (similar to plants and mushrooms).
- If you fail to defeat it within a minute. Bangungot will be fully resurrected and return to phase 2 .
-
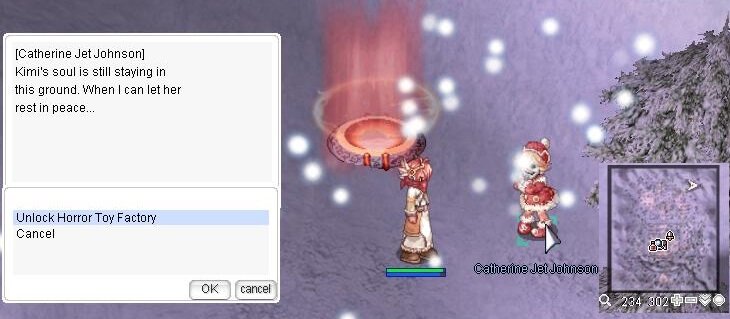
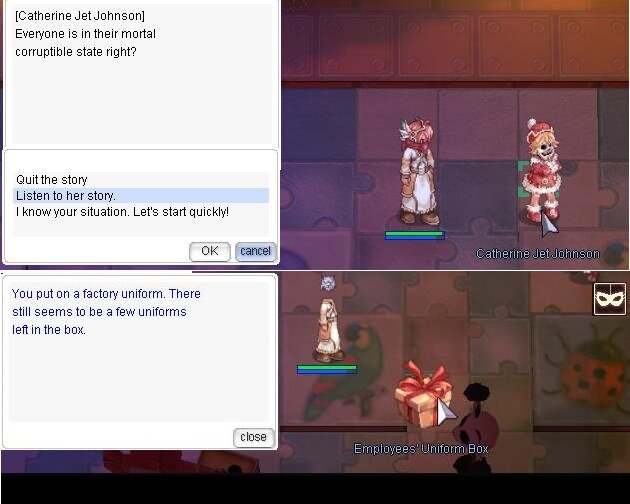
1. Talk to Catherine Jet Johnson ( xmas 237 303) .
2. After the introduction, talk to Employees' Uniform Box who will transform your sprite into a Cookie (Red).
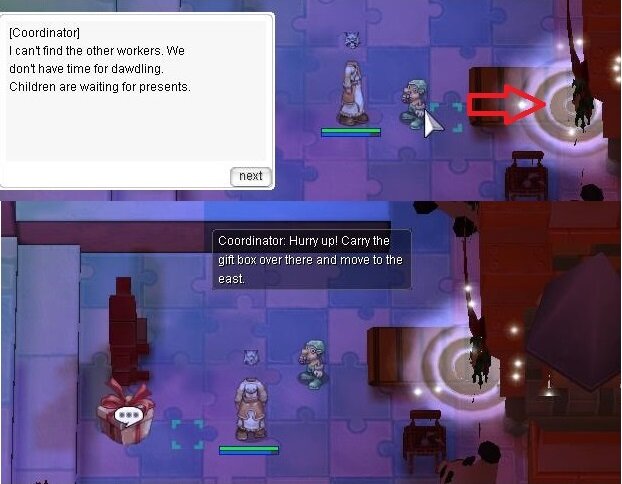
3. Kill Monsters around the room. After enough are killed, there will be an announcement .

4. Move to northwest portion of this room and talk to the Green Cookie.
- You must be a Red Cookie in order to speak with this NPC.
- If you are not a Red Cookie, the NPC will disappear for a short while before reappearing, and will not speak to you until you are a Red Cookie.
5. After the dialogue, talk to the new Myst Case NPC, who will transform you.
- Player must be a Myst Case in order to proceed to the next location.
- If you somehow entered the portal you came from before finishing the second phase, you need to go back to first room and transform into a Myst Case again in order to go back to the second room.
6. After speaking to Catherine, talk to the Myst Case NPC again to change your sprite.
7. There are 10 workers (Green Cookie NPCs) throughout this room. Talk to them and listen to their stories.
- You cannot move, cast skills, or use any consumables while the workers are talking, but monsters can still target you at this time.

8. After talking to all 10 workers, there will be another announcement.

9. Proceed back through the portal you came from, and then enter the north portal to move to the next phase.
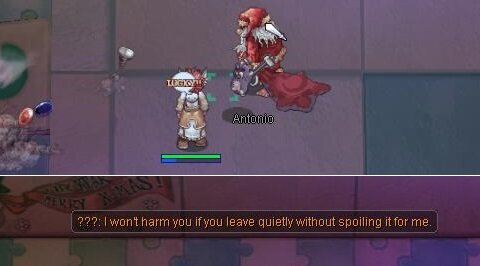
10. Walk to the middle of the room to trigger a dialogue between Santa and Antonio.
- After Antonio disappears, enter the portal to the left.

11. Here, there are many mobs, but only Antonio needs to be killed.
- After Antonio is killed, there will be another announcement, and all remaining monsters will die.
- Antonio may also spawn in the room where the dialogue with Santa took place as well, so be sure to check before proceeding through the left portal.
12. Go back to the center room, and then enter the right portal to move to the last phase.
13. Listen the conversation between Catherine and Celine Kimi. When it finishes, Celine Kimi and her phantom will spawn.
- HP will depend on the number of people in the group.
14. After Celine Kimi is defeated, walk through the southwest portal to treasure room.
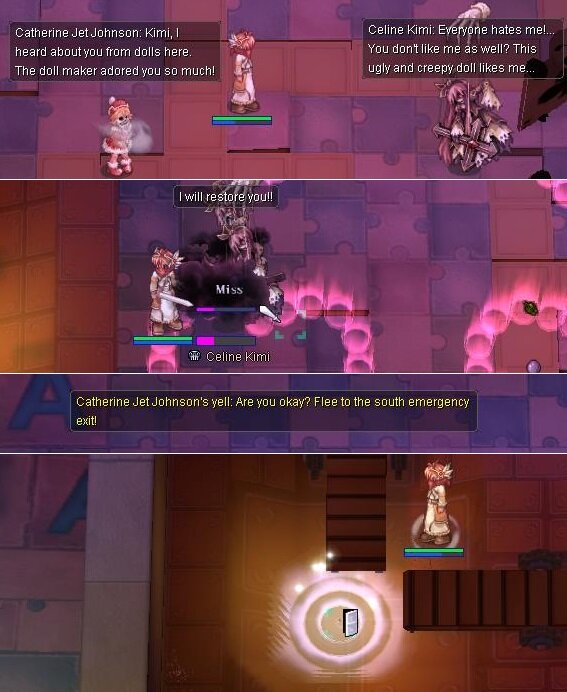
Monsters:
Celine Kimi (MVP)
Talk to Billy the Golden Hands and buy any items.

Items Description Bloody Coin  Closed Mind Box
100  Lush Rose [1]
500 Costume Lush Rose
1000  Costume Santa Hairband
500  Costume Red Bonnet
500  Old Parasol [3]
1000  Hot Tea
7  Sweet Canape
5  Holy Water
1  Water of Darkness
1 Talk to Vargant Cain. He can craft some items.
Items Combination  Celine's Ribbon [1]
 1000 Bloody Coins + Lush Rose [1] +9
 Noble Cross [1]
2000 Bloody Coins +
Noble Cross [1]
2000 Bloody Coins +  Grand Cross [1] (slot combo on NPC)
 Evil Gloves [1]
1000 Bloody Coins +
Evil Gloves [1]
1000 Bloody Coins + Wounded Mind [1] +
  Gentle Heart [1] +
  Red Lantern [1] (treasure room)
Talk to Black Beard Joe. He can enchant your items. Cost 15 Bloody coins
!

Equipments Enchantable slots e?nchan?tment(rando?m) Old Parasol [3]
4th slot  ATK 18 Hit 5
ATK 21 Hit 5
ATK 24 Hit 5
ATK 27 Hit 5
ATK 30 Hit 5
ATK 50 Hit 15
Crit 12 Hit 4
Crit 14 Hit 5
Crit 15 Hit 6
ATK 18 Hit 5
ATK 21 Hit 5
ATK 24 Hit 5
ATK 27 Hit 5
ATK 30 Hit 5
ATK 50 Hit 15
Crit 12 Hit 4
Crit 14 Hit 5
Crit 15 Hit 6
 Matk 1-3%
 Reduces after attck delay by 6%, 8%, 10%
 ASPD +1
 MATK 21 Reduces variable cast time by 10%
MATK 24 Reduces variable cast time by 10%
MATK 27 Reduces variable cast time by 10%
MATK 30 Reduces variable cast time by 10%
MATK 21 Reduces variable cast time by 10%
MATK 24 Reduces variable cast time by 10%
MATK 27 Reduces variable cast time by 10%
MATK 30 Reduces variable cast time by 10%
3rd / 4th slot 4rd slot
ATK 9 Hit 3
ATK 12 Hit 4
ATK 15 Hit 5
ATK 18 Hit 5
Crit 6 Hit 2
Crit 9 Hit 3
Crit 12 Hit 4
Matk 1-2%
Reduces after attck delay by 4%,6%, 8%, 10%
MATK 12 Reduces variable cast time by 8%
MATK 15 Reduces variable cast time by 10%
MATK 18 Reduces variable cast time by 10%
MATK 21 Reduces variable cast time by 10%
3rd slot
 Stats 1-3
Red Lantern [1]
Stats 1-3
Red Lantern [1]
(Only Right slot)
2nd / 3rd / 4th slot 4th slot
Stats 1-2
3rd slot
Stats 1-3
2nd slot
Stats 1-4
-
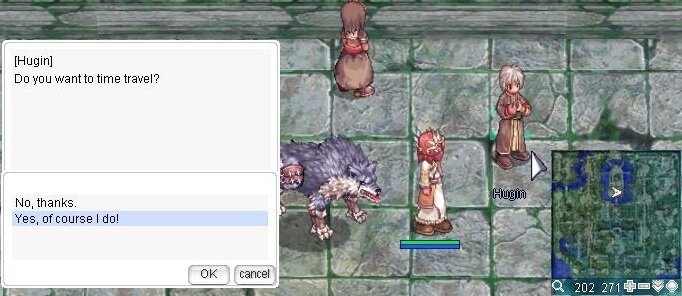
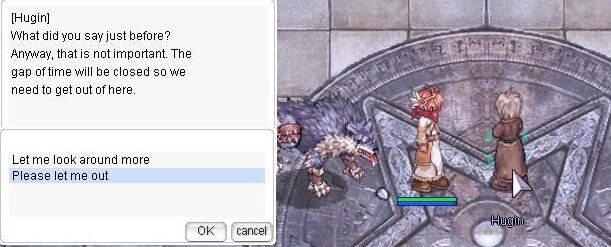
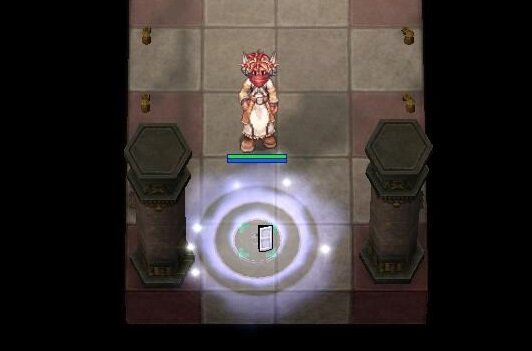
1. Talk to Hugin glast_01 204 273. Create and enter the instance.
2. The party leader should head north after talking to Varmundt and speak to Heinrich. A cutscene will trigger between Heinrich and Himelmez.
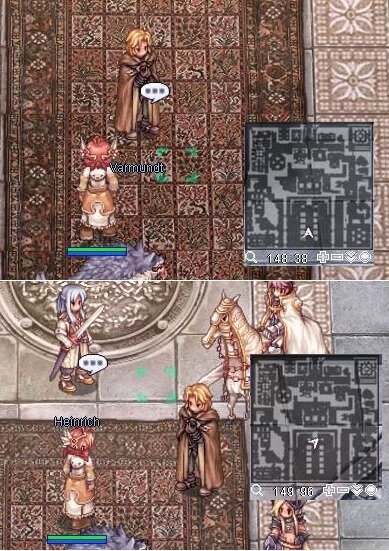
3. After their conversation, Corrupted Abysmal Knight and Suffering Khalitzburg will spawn. You do not have to kill them. After a few minutes Heinrich will kill all the monsters. You can kill monsters if you want.
4. Heinrich and Varmundt will ask the player to help in finding any survivors that might need help. After the two disappear a portal will open to the west.
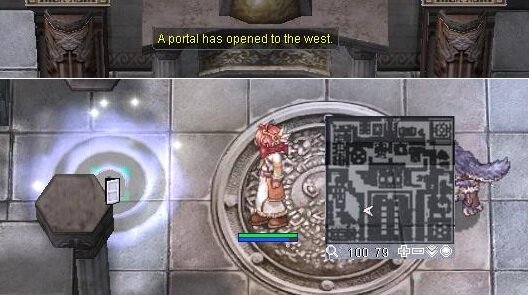
5. Head into the portal and cross over to the west side. Once enough mobs have been killed an announcement will be made to find any survivors.
All monsters also have the chance to drop Coagulated Spell
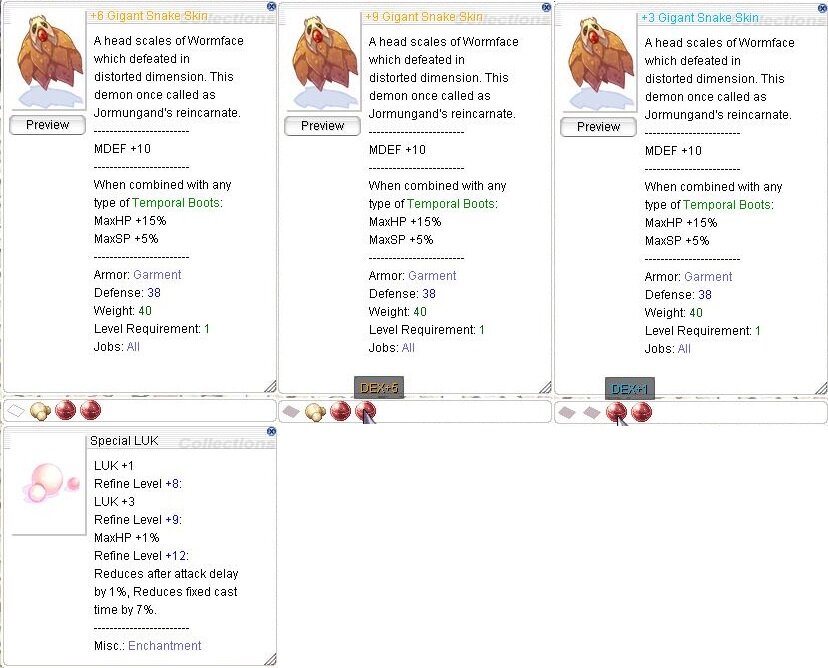
 which can be used for enchanting Temporal Boots .

6. At this point only party leader needs to go to the southwest corner of the map and chat with survivor Altar Boy Domun. The rest of the party can head over to central hall. Once leader chats with the survivor, a portal will open to the east.
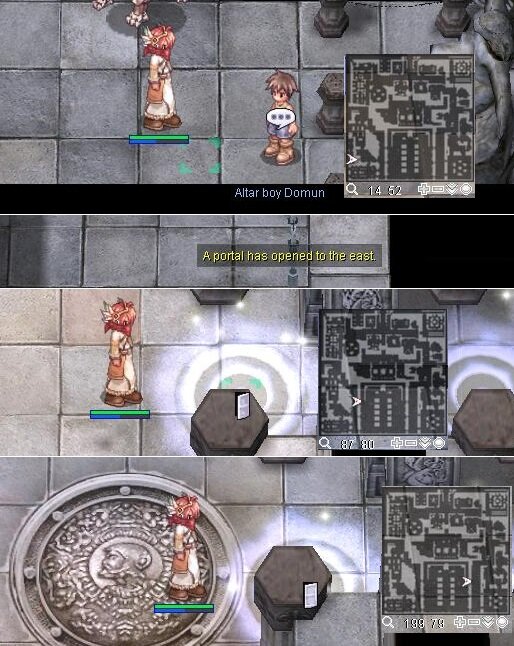
7. Head to the east portal. Similar to the west side, the party needs to clear sufficient number of mobs to activate the survivor Holgren the Destroyer which is located up the eastern stairs. Again, only the party leader needs to speak with the NPC to open the portal in the North-east area. The rest of the party can go ahead.
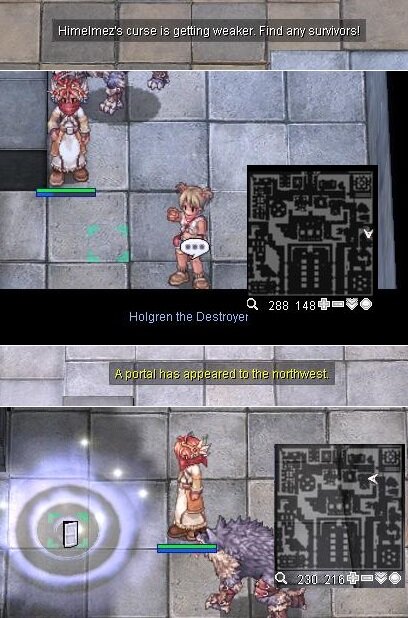
8. The north area of the map is filled with Corrupted Palace Guard and Wandering Archer. Once enough mobs have been defeated head to the central north area of the map. Here you will again find Himelmez chatting with Varmundt and Heinrich. Once she disappears the first MVP will spawn. The players should bring Stone-immunity and Silence-immunity equipment on this fight.
If any of the party members are dead when the MVP dies, then they won't receive the kill count and are unable to receive any items from Varmundt.

9. Go into the north portal to enter the 2st Floor of Old Glast Heim. Here Heinrich will again have a discussion with Varmundt and a portal will open in the west.

10. Enter the west portal. Upon clearing sufficient mobs, an announcement will be made stating the appearance of an evil presence. Find and defeat the 1st Commander of Destruction mini boss which will open a portal to the east.
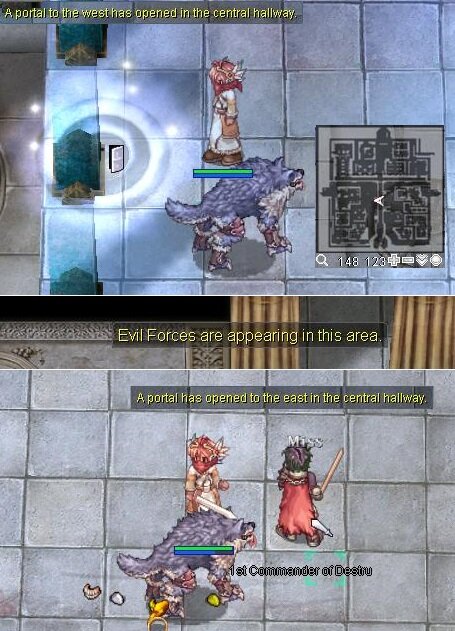
11. Head to the east portal via the central bridge. Similar to the west side, clear all the mobs to spawn the 2nd Commander of Destruction mini boss and defeat her. A portal will open to the north.
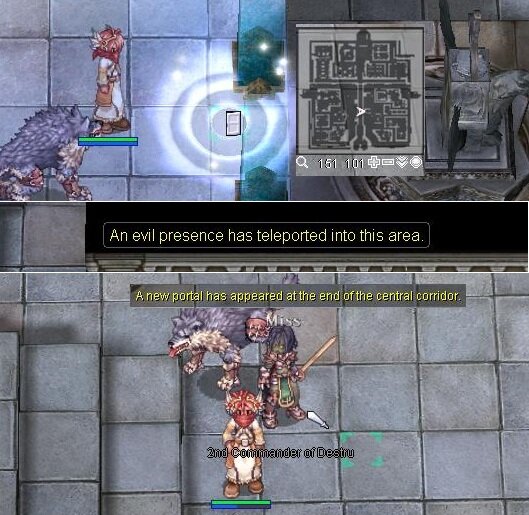
12. Enter the north portal and as you walk further north past some Decomposed Bodies, you will see Heinrich confronting Himelmez again. There is a floating body of the last survivor in Old Glast Heim which Himelmez will convert into the MVP Amdarais. Once the dialogue is over the MVP will spawn at the location of the floating body. During the MVP fight, random mobs will spawn in the central area. The player can bring Amdarais to the northern stairs area to avoid the random mobs.
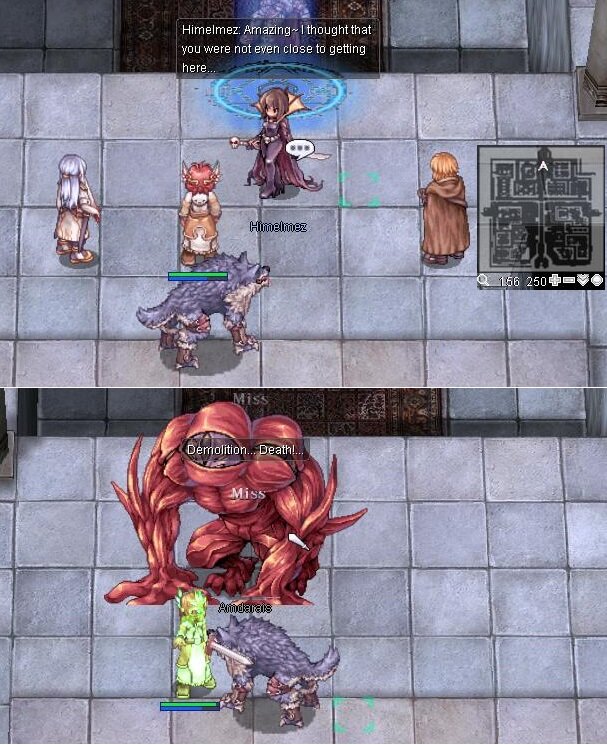
13. Defeat the MVP and speak with Hugin. Receive 5 x Temporal Crystal
 + 5 x Coagulated Spell + 1 750 000 Base/Job Exp.
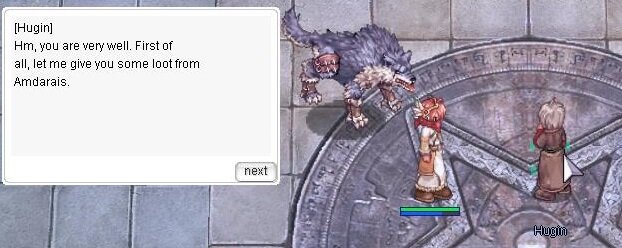
Bonus!
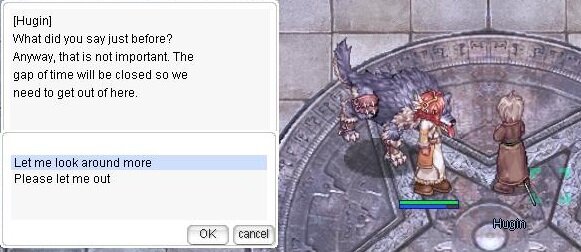
Go to the Secret Room on the 1nd Floor, receive items.
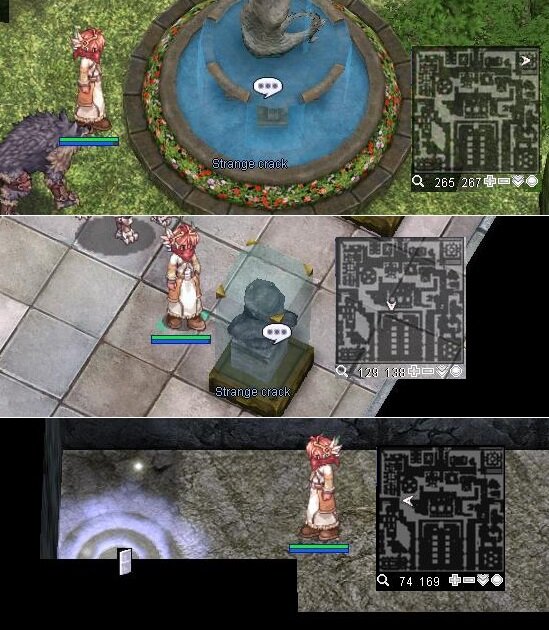
Return to Hugin.
Monsters:
Amdarais (MVP 2F)
Root of Corruption (MVP 1F)
2nd Commander of Destruction (miniboss 2F)
1st Commander of Destruction (miniboss 2F)
Craft Temporal Boots.
Talk to Hugin's Butler. She will exchange 1 x Temporal Crystal
for a Temporal Boots .
.
The player has to be wearing the Temporal Boots
to upgrade or enchant them !
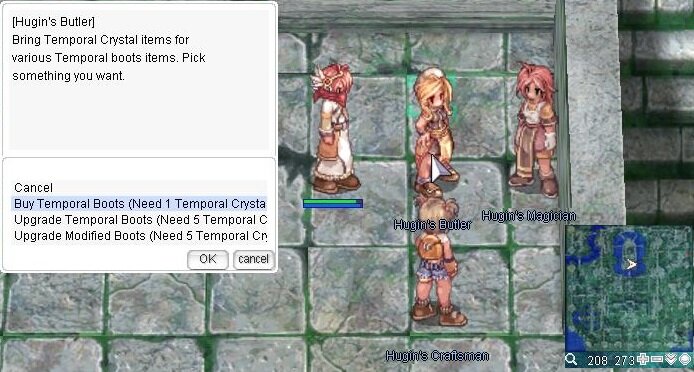
She will exchange 5 x Temporal Crystal
for a Tempolar Boots - All 3rd Classes or Modified Boots - Rebellion / Kagerou / Oboro:

Hugin's Craftsman can be slotted your boots for 5 x Temporal Crystal
.
Hugin's Magician can enchant the 3rd and 4th slots of Temporal Stat Boots (without slot) using Coagulated Spell
- Player can increase the level of the 4th slot enchantment 3 times in exchange for additional Coagulated Spells.
- After a level 4 enchant, the 3rd slot can be enchanted with a random special enchantment.
Enchant Lvl 1 ( 1 x )
Lvl 2 ( 4 x )
Lvl 3 ( 15 x )
Lvl 4 ( 30 x )
Fighting Spirit ATK 15 HIT 5 ATK 18 HIT 5 ATK 21 HIT 5 ATK 24 HIT 5 Archery Increases long range physical attack by 2% Increases long range physical attack by 4% Increases long range physical attack by 6% Increases long range physical attack by 8% Spell MATK +9 Reduces variable cast time by 6% MATK +12 Reduces variable cast time by 8% MATK +15 Reduces variable cast time by 10% MATK +18 Reduces variable cast time by 10% Vitality Vit +2 Vit +3 Max HP +1% Max HP +2% Attack Speed Reduces after attack delay by 4% Reduces after attack delay by 6% Reduces after attack delay by 8% Reduces after attack delay by 10% Lucky Luk +3 Luk +4 Luk +5 Luk +6 Special enchantment 3rd slot:
 Bear's Might - STR+200 ( when receive physical damage )
Speed of Light - ASPD +100% + Flee (100) ( when dealing physical damage )
Mus?cle Fool - VIT+200 ( when receive physical damage )
R?unaway Magic - INT+200 ( when dealing magical damage )
Hawk Eye - DEX+2?00 ( when dealing physical damage )
Lucky Day - LUK+20?0 and a chance to get a treasure b?ox
Bear's Might - STR+200 ( when receive physical damage )
Speed of Light - ASPD +100% + Flee (100) ( when dealing physical damage )
Mus?cle Fool - VIT+200 ( when receive physical damage )
R?unaway Magic - INT+200 ( when dealing magical damage )
Hawk Eye - DEX+2?00 ( when dealing physical damage )
Lucky Day - LUK+20?0 and a chance to get a treasure b?ox  ( when dealing or receive damage)
Hugin's Magician can reset your temporal shoes in two ways:
1) 70% - 3 x Contaminated Magic
 + 10 x Temporal Crystal
2) 100% - 1 x Powerful Dimensional Essence
 ( Cash shop item)
New NPC
After modifying level 4, you can modify the 3rd slot of your choice 100%.
5 000 000 Zeny + 100 x Coagulated Spell

-
Quest Prerequisite(s): Invitation to Royal Banquet
1. Go through step 2-4 The Room of Consciousness Instance.
2. Go to the hallway west of the room and follow the path. Go out the portal.
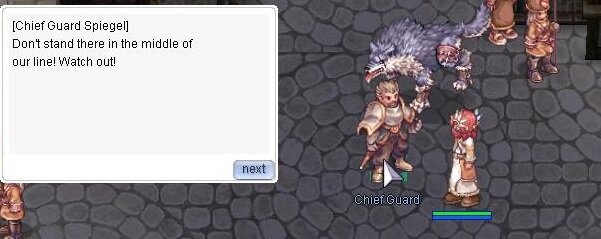
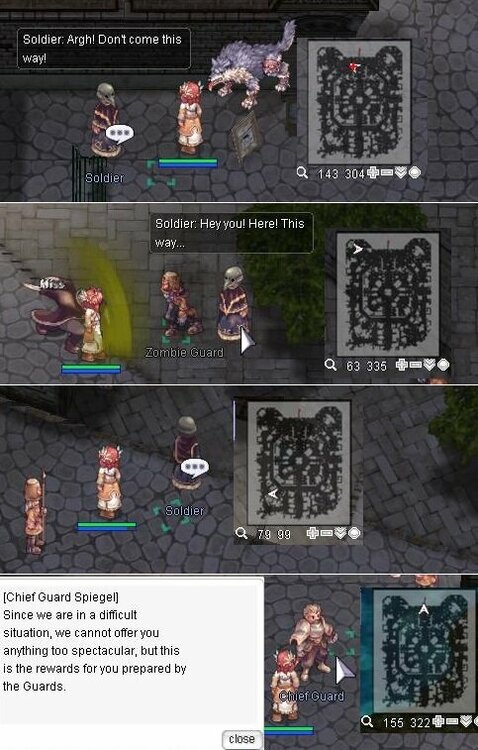
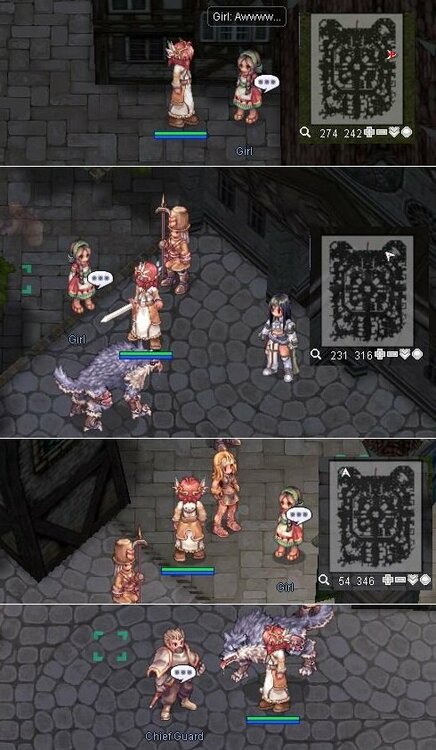
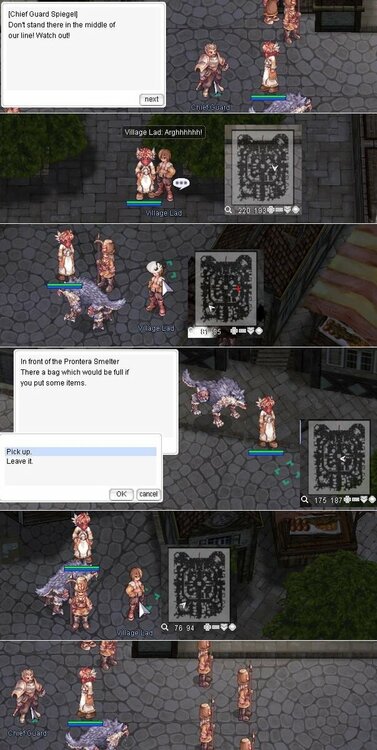
3. Talk to Chief Guard Spiegel. He will assign you to find some individuals and escort them to safety. The first location will be marked on your mini map. Follow the location. You'll see shadows on the ground where the NPC will pop up. Go near them to to trigger the events. There are 4 possible NPCs you have to escort.
4. Return to Chief Guard Spiegel and he will reward you 4 000 000 Base exp + 1 250 000 Job exp + 4 x Proof of Honor

Case 1
Case 2
Case 3
Case 4

-
Quest Prerequisite(s): Invitation to Royal Banquet
1. Main story
1.1 Talk to Royal Chef in Prontera Castle. He will mistaken you for being a chef and sends to the kitchen.

1.2 Talk to Royal Head Chef. She will ask to get sauce from Sauce Master in the same room.

1.3 Sauce Master will ask you to prepare a special sauce of special ingredients. ( The choice will be 1 of 4 )
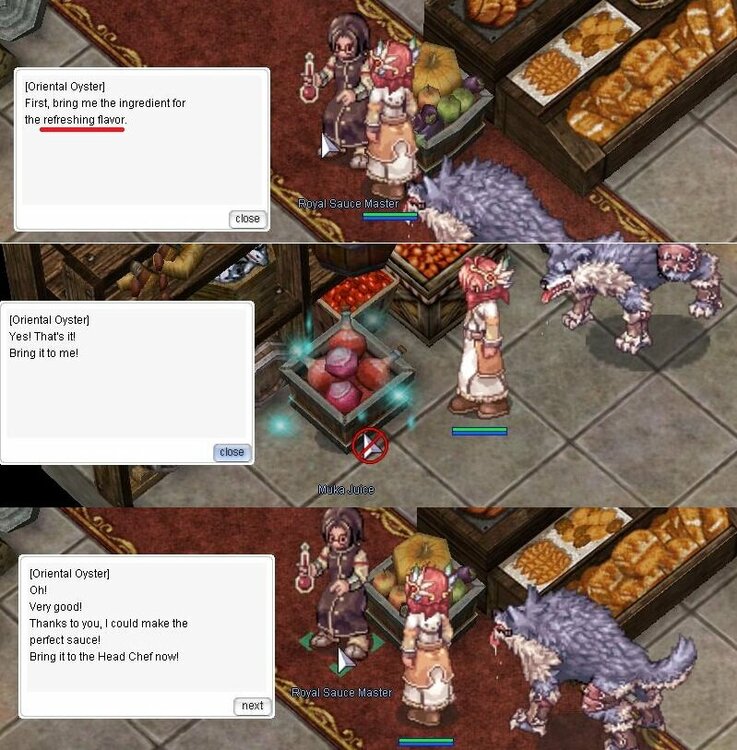
Refreshing Flavor - Muka Juice (north west corner)
Chewy Texture - Poring Jelly (near the Royal Head Chef)
Shines Brightly - Shining Plant (along east wall)
Soft Taste - Giantaurus Butter (on north east table)

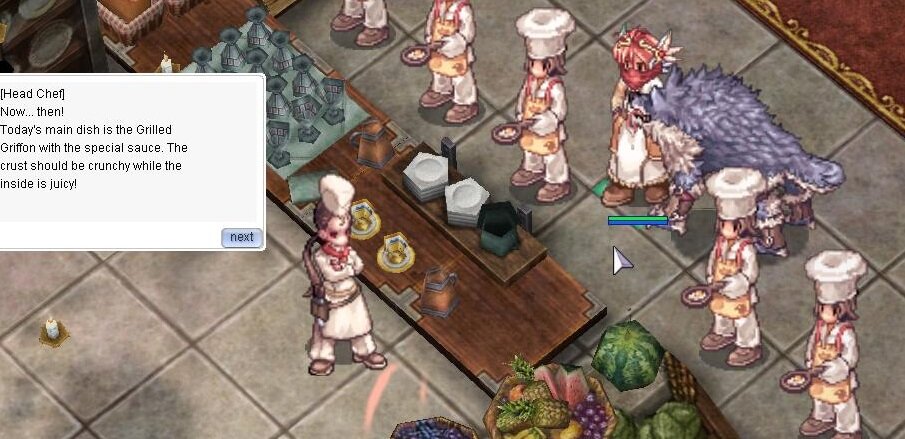
1.4 Now take the sauce to Royal Head Chef.

1.5 She will ask to stand in a free place. Then, the grilled griffon preparation will begin!
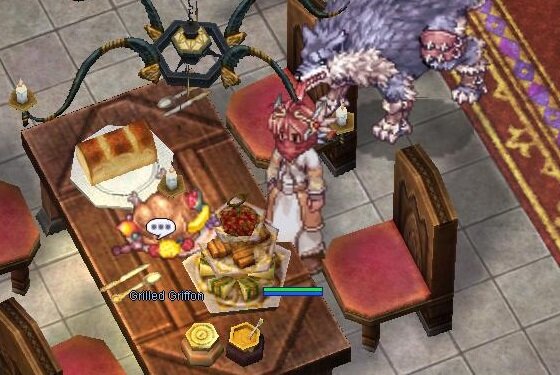
1.6 After finishing the Griffon Barbecue , you are to serve it at the dining room. Head to dining room and look for a Grilled Griffon on the bottom-left corner table.
1.7 After that, find Tamarin and he will ask you to find his friend Dyu.
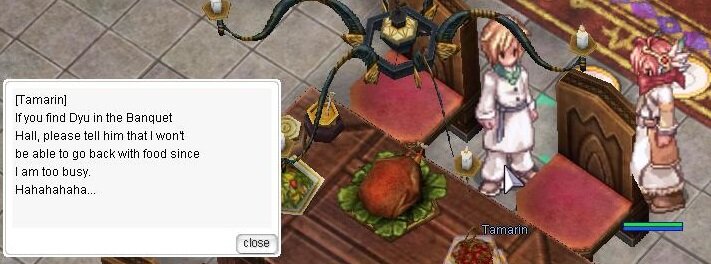
1.8 Dyu is at Banquet Hall. Tell him about Tamarin. Then talk to Magi.

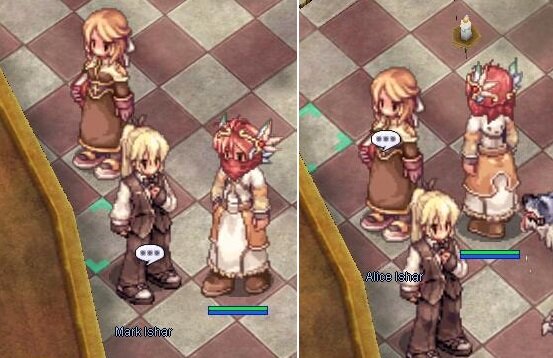
1.9 You are told to speak with Mark Ishar upstairs in the hall on the left side. Then talk to Alice.
1.9.1 Return to Tamarin and he will ask you to help gather 15 x Luxury Plate
 on the floor.

1.9.2 And then give the 15 x Luxury Plate
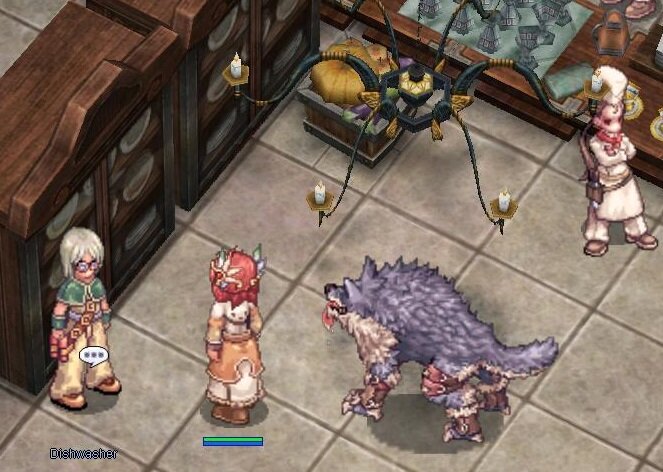
to Dishwasher, he is grateful to you.
1.9.3 You should speak with the Royal Head Chef. She will reward you 3 500 000 Base exp + 3 500 000 Job exp + 10 x Proof of Honor
Access to 3 kitchen daily quests ( Washing 15 Dishes / Unexpected Sauce / Griffin Barbecue)
2. Washing 15 Dishes.
2.1 Talk to Dishwasher.

2.2 Dishwasher will ask you to help gather 15 x Luxury Plate
on the floor.
2.2 And then give the 15 x Luxury Plate
to Dishwasher. Receive 4 x Proof of Honor
3. Unexpected Sauce
3.1 Talk to Sauce Master.
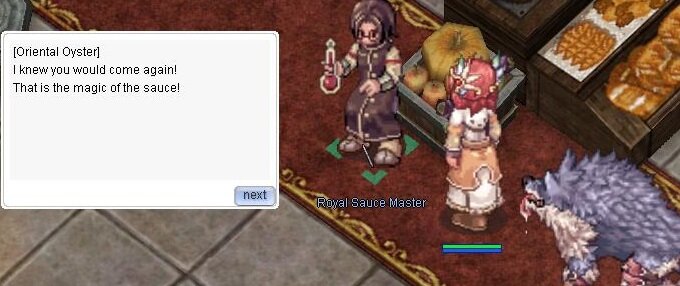
3.2 Sauce Master will ask you to prepare a special sauce of special ingredients. ( The choice will be 1 of 4 )
3.3 Talk to Sauce Master. Receive 4 x Proof of Honor
4. Griffin Barbecue
4.1 Talk to Royal Head Chef.

4.2 She will ask to stand in a free place. Then, the grilled griffon preparation will begin!
4.3 Talk to Royal Head Chef. Receive 4 x Proof of Honor
-
Quest Prerequisite(s): Invitation to Royal Banquet
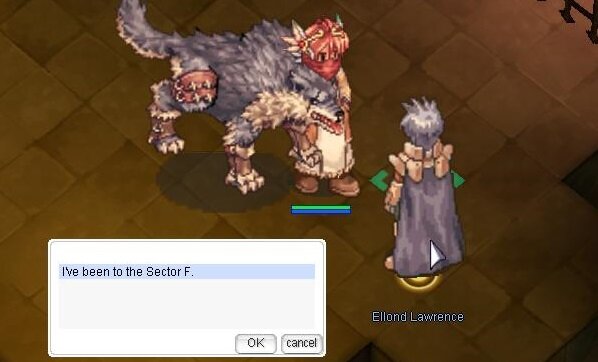
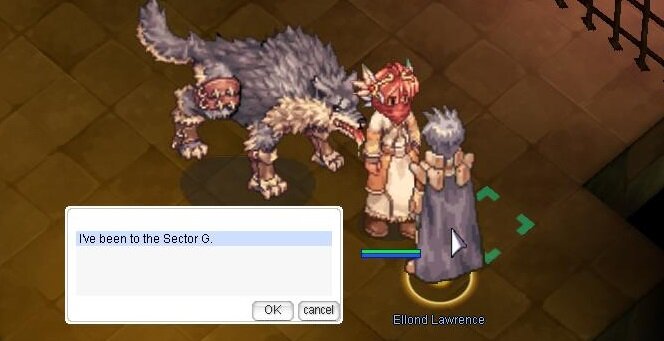
1. Main Story.
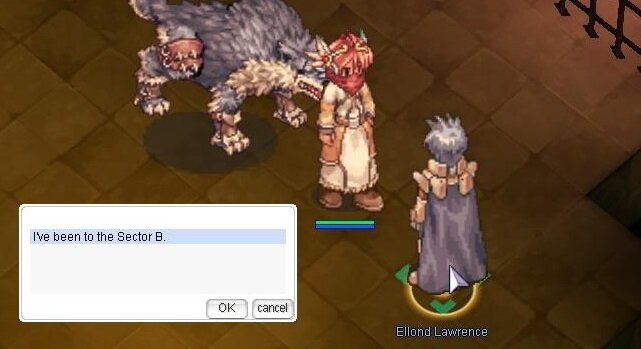
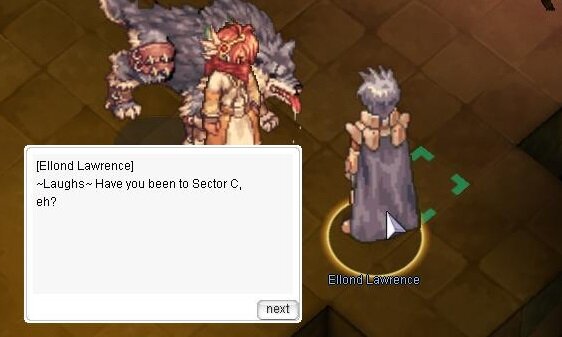
1.1 Go to the Prontera castle prison and talk to Ellond Lawrence (prt_pri00 48 118). (To the right of the banquet hall)
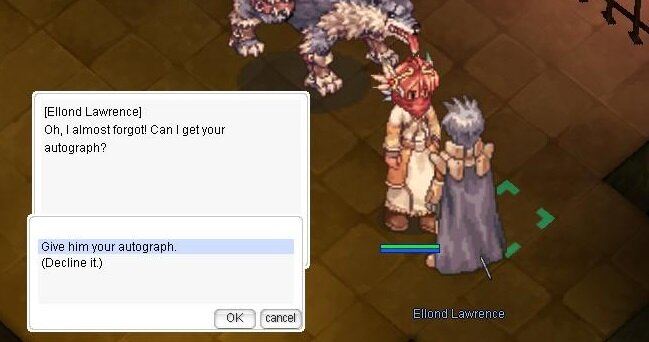
1.2 Talk to him until you can access underground prison.
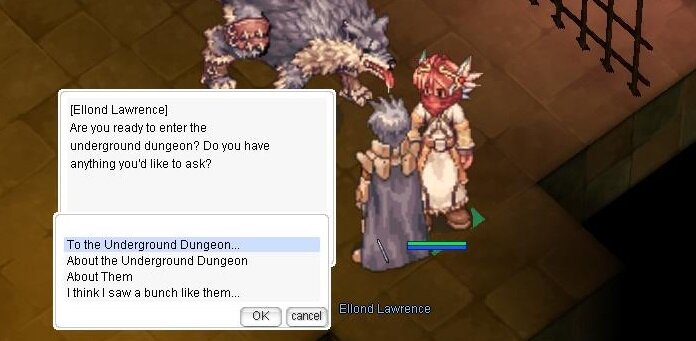
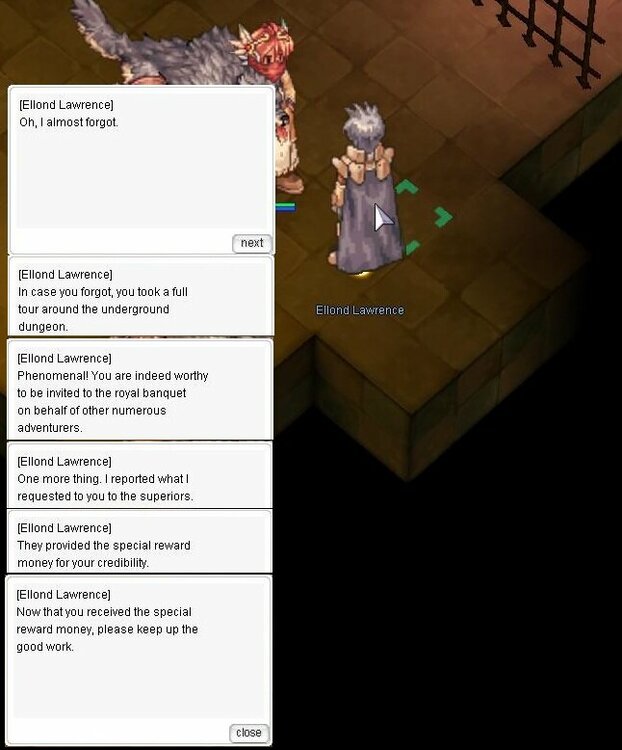
1.3 Go to the underground prison and find 7 MVP Prisoners, talk with all of them and poring prisoner.
1.4 After all quests return to Ellond Lawrence to report all your findings. He will reward you 10 500 000 Base exp + 27 500 000 Job exp + 2 x Proof of Honor
ALL Quests Reset 4:00 AM.
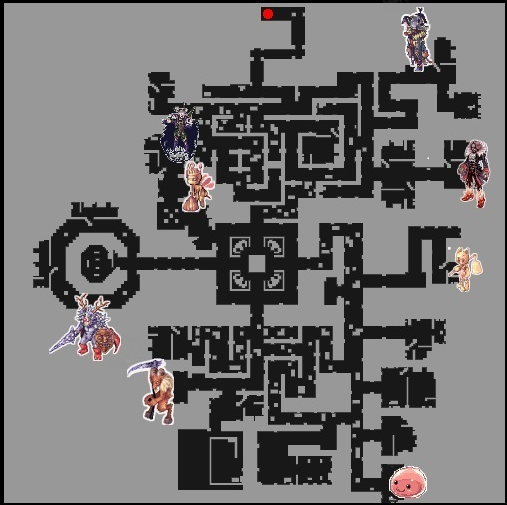
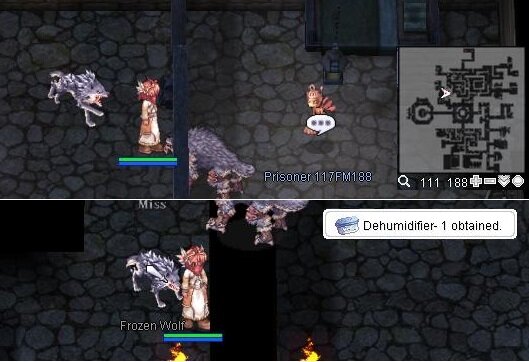
2. Refreshing Prison Life (Mistress)
2.1 Talk to Prisoner 117FM188
2.2 Bring her 20 x Dehumidifier
 .
.
2.3 She will reward you 3 500 000 Base exp + 2 500 000 Job exp + 4 x Proof of Honor
2.4 Restricted Sector F
3. Suppressing Darkness (Dark Lord)
3.1 Talk to Prisoner 103GD214.
3.2 Bring him 20 x Flower
 . He will only require 1 x flower the first time you do the quest.
3.3 He will reward you 3 500 000 Base exp + 2 500 000 Job exp + 4 x Proof of Honor
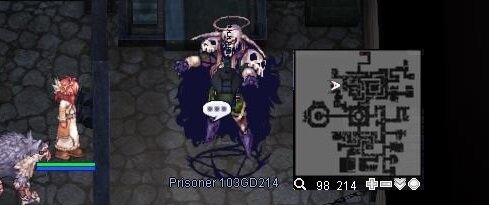
3.4 Restricted Sector G
4. To My Beloved Fellow (Drake)
4.1 Talk to Prisoner 243AD265
4.2 Bring him a Prisoner's Letter
 . It is obtained by talking to a Dark Shape around the dungeon.
4.3 He will reward you 3 500 000 Base exp + 2 500 000 Job exp + 4 x Proof of Honor
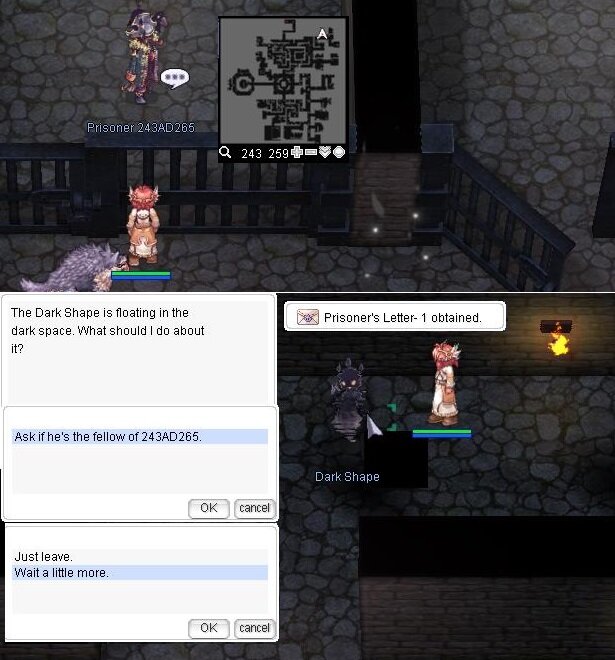
4.4 Restricted Sector A

5. Lowly Standards (Dracula)
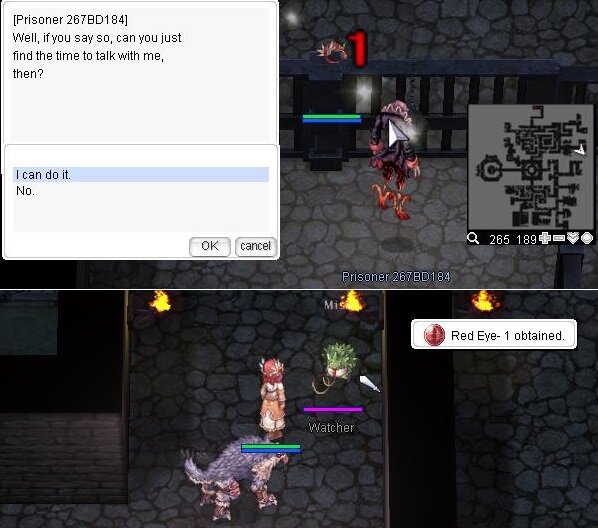
5.1 Talk to Prisoner 267BD184
5.2 Bring him 20 x Red Eye
 . These are obtained from the Watcher mobs in the prison.
5.3 He will reward you 3 500 000 Base exp + 2 500 000 Job exp + 4 x Proof of Honor
5.4 Restricted Sector B
6. Clean Life ( Moonlight Flower)
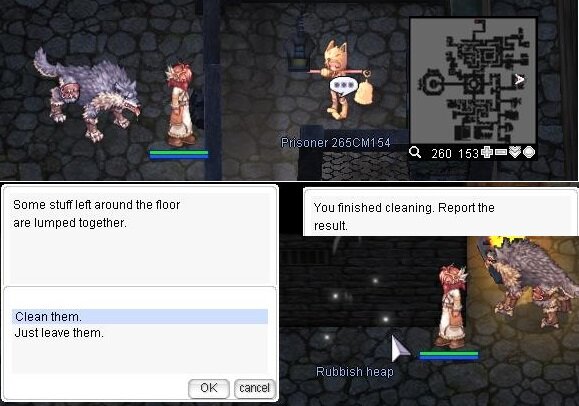
6.1 Talk to Prisoner 265CM154
6.2 She will ask you to clean up the prison. You will have to find some Rubbish heap around the map and it will tell you once you've cleaned enough.
6.3 She will reward you 3 500 000 Base exp + 2 500 000 Job exp + 4 x Proof of Honor
6.4 Restricted Sector C
7. Bothersome Little Thing (Stormy Knight)
7.1 Talk to Prisoner 55HK115
7.2 Bring him 20 x Sandpaper
 . These are obtained from the Taffy mobs in the prison.
7.3 He will reward you 3 500 000 Base exp + 2 500 000 Job exp + 4 x Proof of Honor
7.4 Restricted Sector H
8. Talk to Prisoner 243DV17
8.1 Restricted Sector D

9. Finding Lights ( Baphomet)
9.1 Talk to Prisoner 95EB72
9.2 Bring him a 1 x Bright Light
 . It is obtained by clicking the lights in the dungeon at a random chance.
9.3 He will reward you 3 500 000 Base exp + 2 500 000 Job exp + 4 x Proof of Honor
9.4 Restricted Sector E

-
1. Talk to Hero Token Exchanger. NPC can craft you a Heroic Ring for 30 x Heroic Token

Tokens can be obtained for the passage of the instance: Isle if Bios / Morse's Cave

2. Talk to Expert Enchanter Byrnes.
He can enchant your ring for free 1-4 slot.
Reset all enchants for a ring costs 3 x Heroic Token
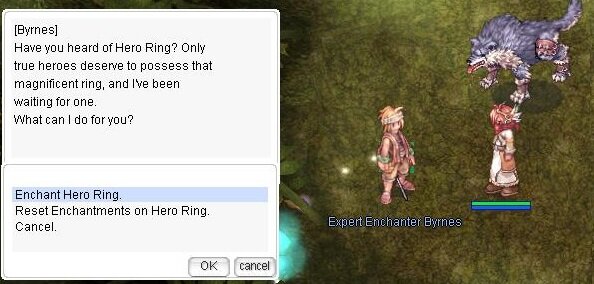
Slot 1 Slot 2 Slot 3 Slot 4  STR 1-5
AGI 1-5
VIT 1-5
INT 1-5
DEX 1-5
LUK 1-5
STR 1-5
AGI 1-5
VIT 1-5
INT 1-5
DEX 1-5
LUK 1-5

 ATK 1-5%
MATK 1-5%
Max HP +1-5%
ATK 1-5%
MATK 1-5%
Max HP +1-5%
 Max SP 25, 50, 75, 100, 150
 Def 3,6,9,12,15
 Mdef 1,2,3,4,5
-
FE:
-
Prize of Hero is an MVP drop from the final bosses of Morse's Cave and Isle of Bios.

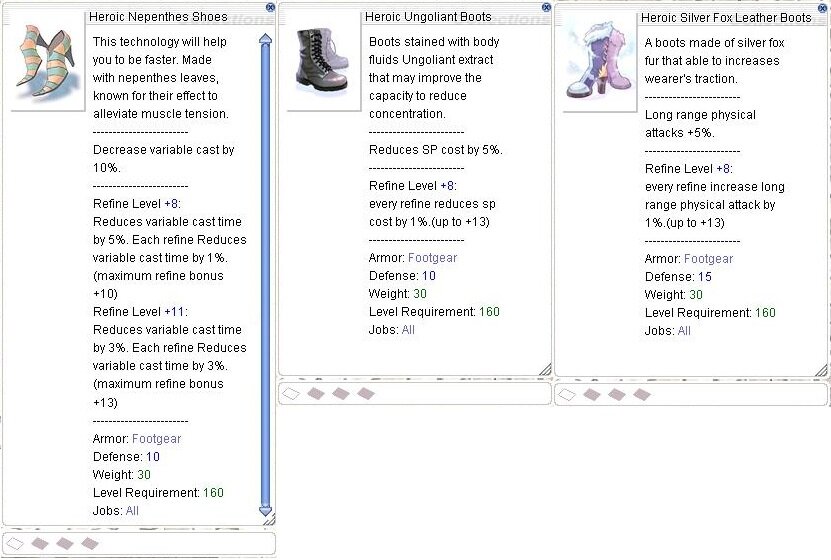
The equipment listed below are attainable only through opening Prizes of Hero. They all require Base Level 160 to be worn, and each of the armor pieces are exclusive to their respective classes. The footgear items are wearable by all classes.
Armors:

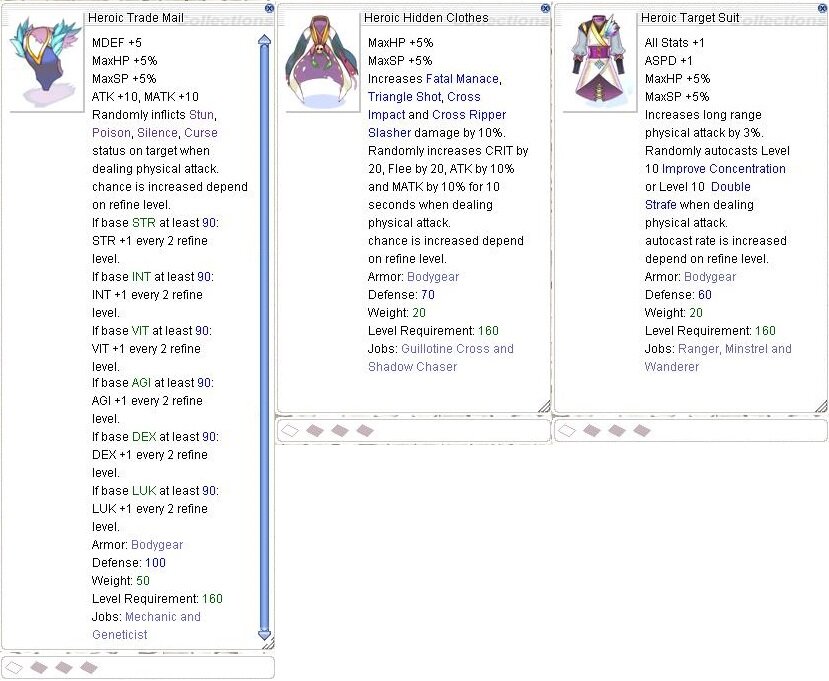
Shoes:
-
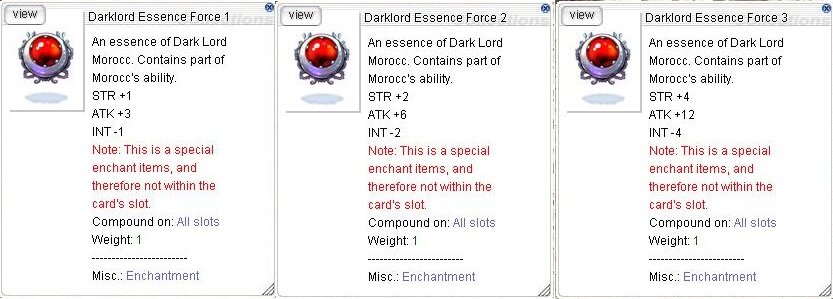
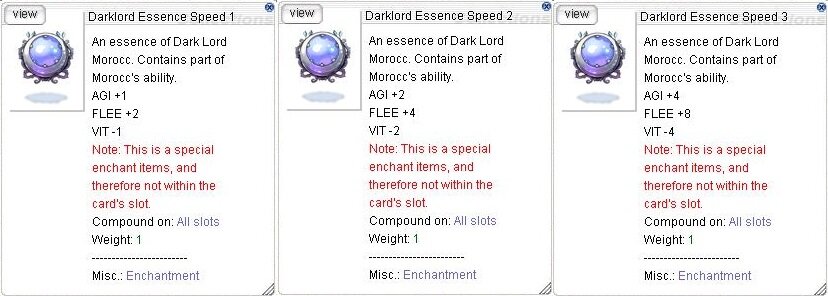
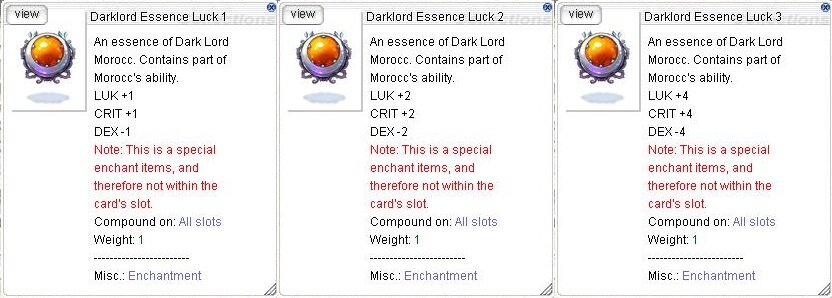
1. Completing the monster hunt mission will earn you a Expedition prize box
 . This contains an enchant item [Essence of Demon God] at random.

-Note! Inserts in any slot on things. FE
-Essence can be extracted
Darklord Essence Force
Darklord Essence Speed
Darklord Essence Vitality
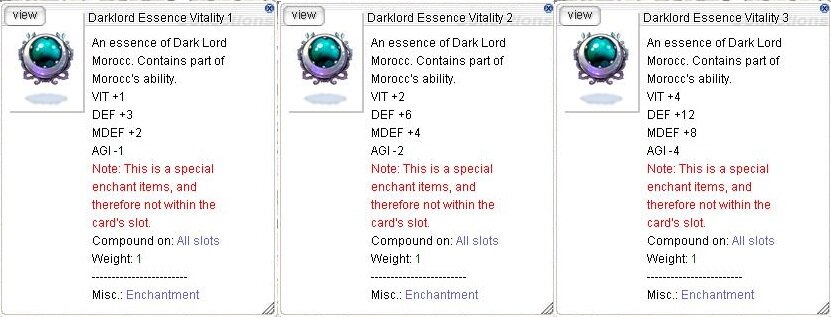
Darklord Essence Intelligence
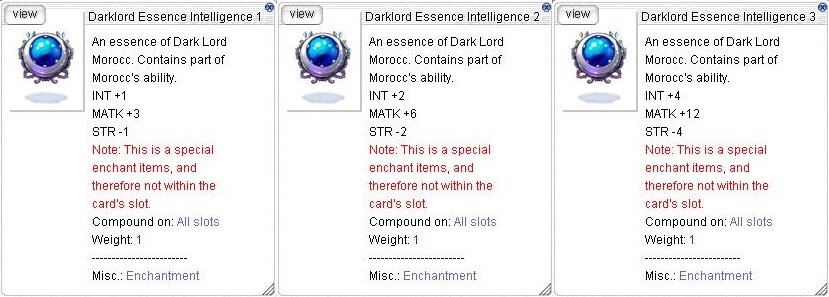
Darklord Essence Concetration
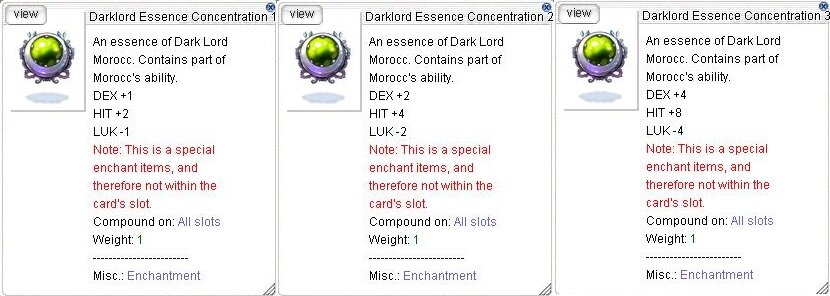
Darklord Essence Luck
-
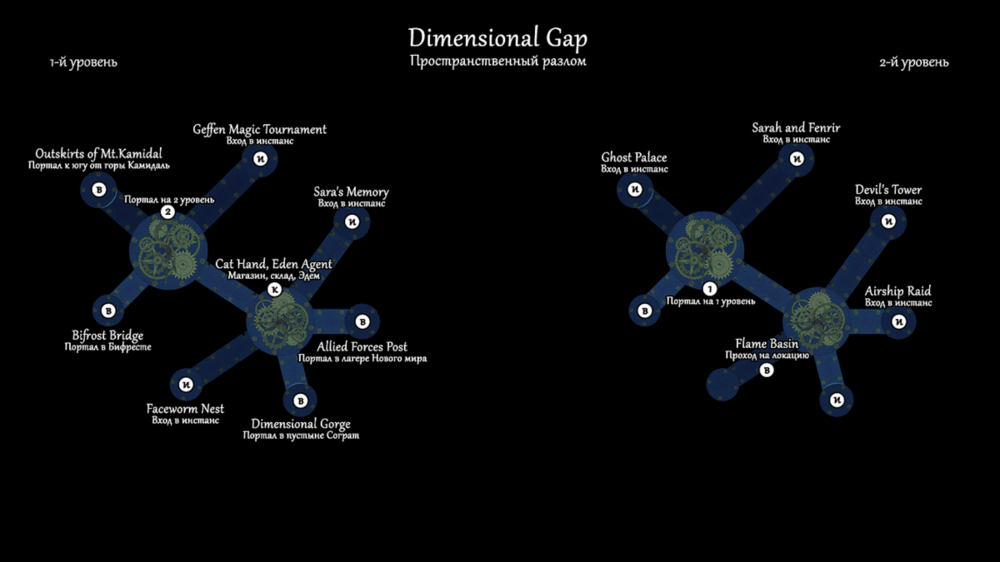
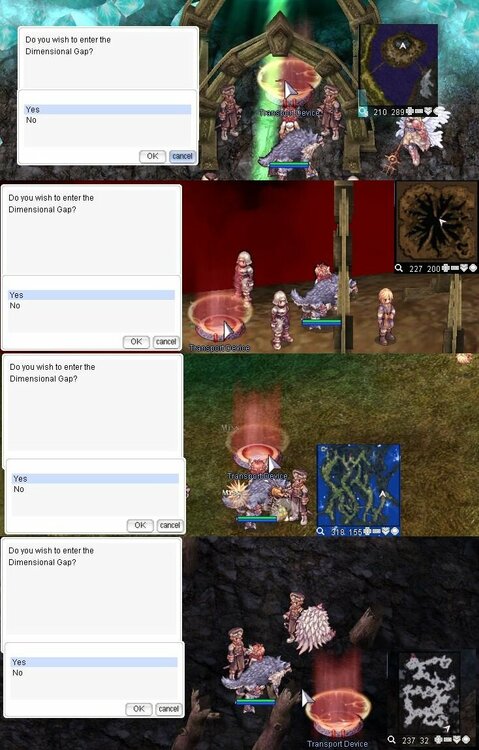
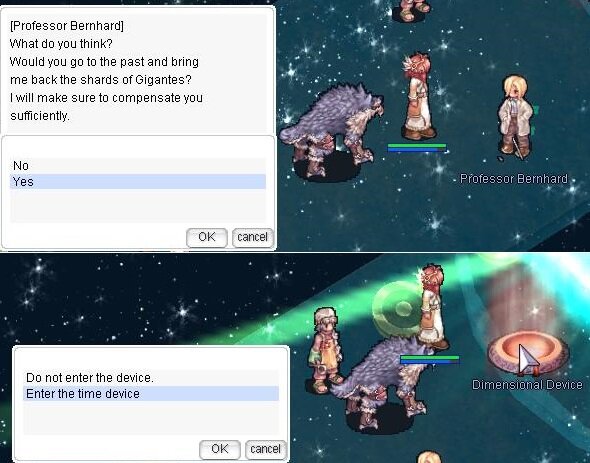
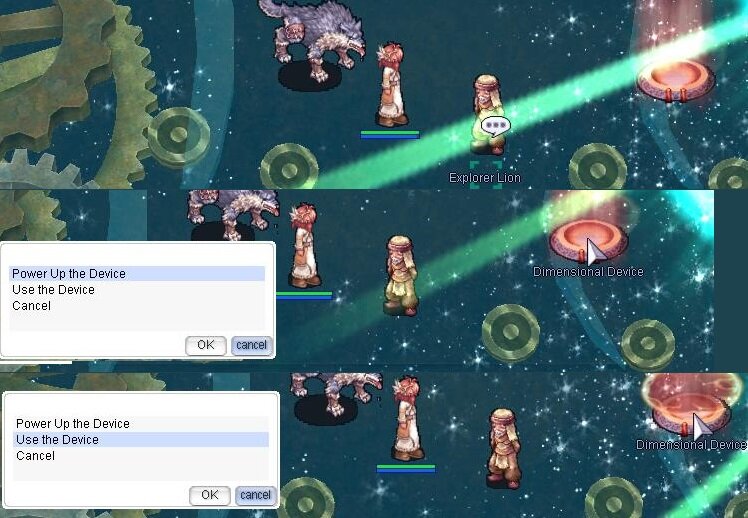
1. To start this quest, you have to use the Dimensional Device located on Rune Midgard Allied Forces Post within the New World. It will warp you into the Dimensional Gap.
2. Talk to Professor Bernard ( storyline 2) and then use Dimensional Device in Dimensional Gap to start the quest.
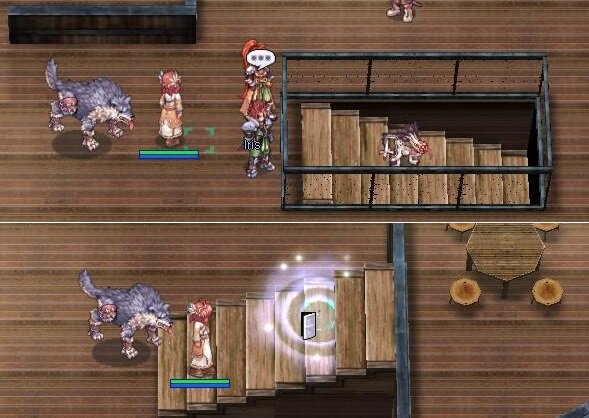
3. Walking near Fenrir will trigger the first animation. Mutant Galion will appear and attack you.
They are fairly easy to kill.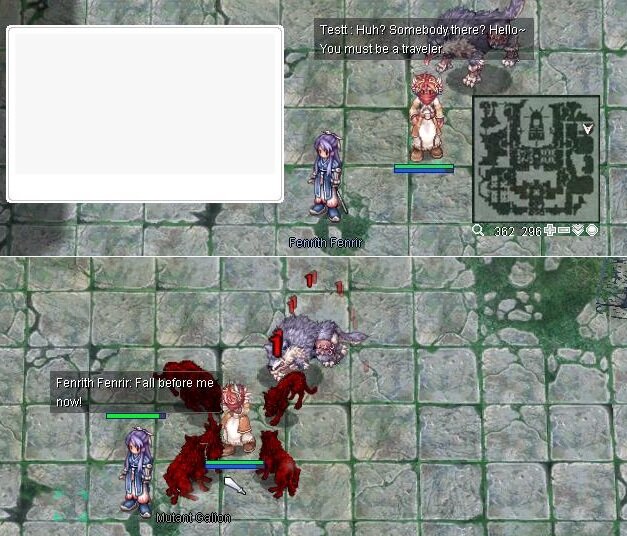
Fenrir will finish them off once her progress bar ends.
4. Keep walking south and then go left up until you meet with Fenrir again.
The storyline is now split into two parts and you have to choose what you're going for:

- Storyline 1. Follow the main story by meeting with Fenrir at the top left section of the map.
-
Storyline 2. Kill 6 x Ancient Gigantes and farm Fragment of Gigantes
 for Professor Bernhard.
It is possible to do a mix of both stories to get the maximum amount of Fragment of Gigantes
. It will be difficult to do on time.
You have 5 minutes to reach this location. If you don't make it in time, then you can't get through the main storyline 1.
After this message, you have 5 minutes to reach the castle. If you don't make it in time, you will not be able to get a reward for the MVP, but you but you can kill the monsters and get items + storyline 2.
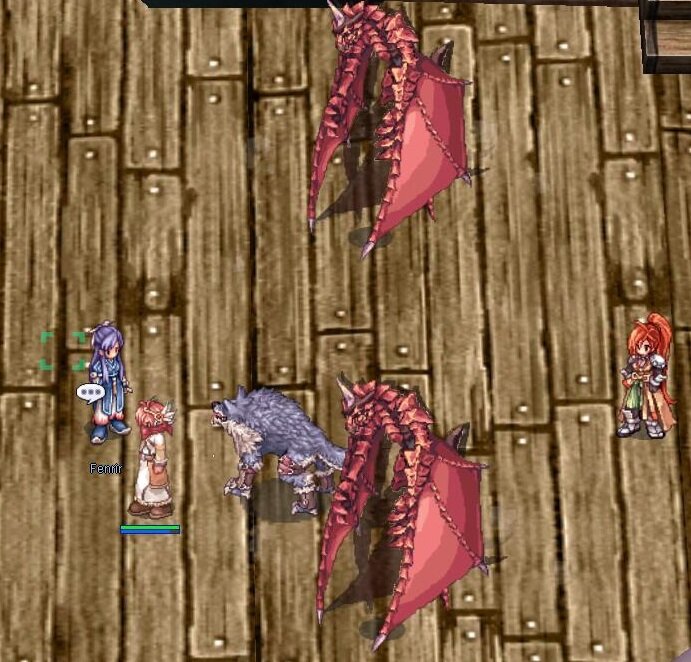
If you choose help to Fenrir (Main Storyline 1):
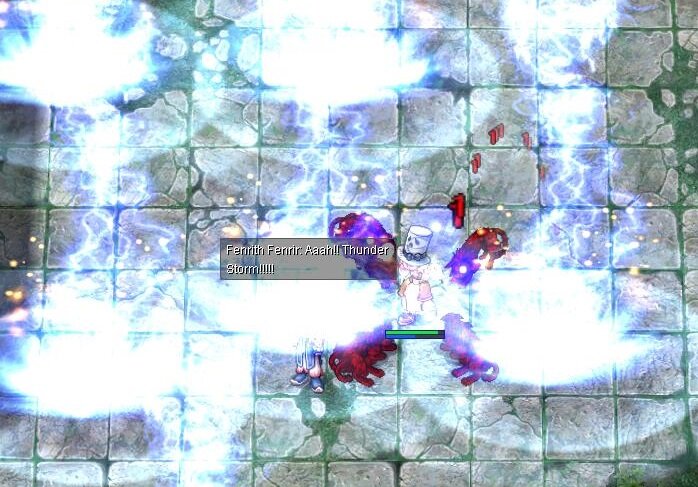
1. Keep walking left and then go all the way up to meet with Fenrir. The party leader has a marking on the minimap to indicate the location. You have 5 minutes to reach this location.
2. Once you walk near Fenrir, an animation will trigger. You must kill both Gigantes to progress, one of them is immune to physical damage and the other is immune to magic damage.You can wait it out and hide, Fenrir will kill the giants through Lord of Vermilion.
3. You'll meet Fenrir again and she tells you to meet her at the castle (middle of the map). You have 5 minutes to reach the castle.
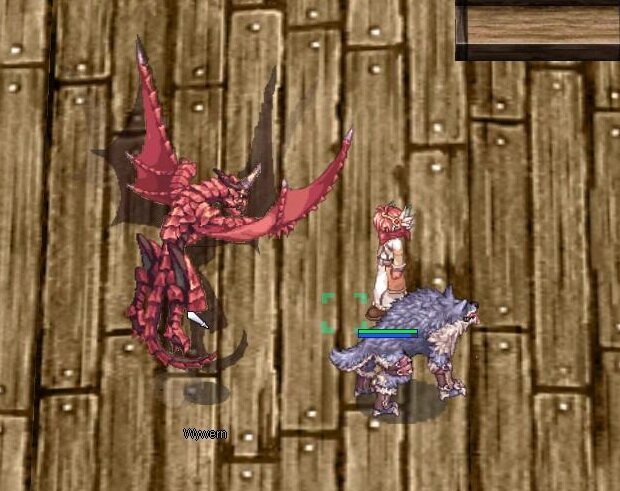
4. You'll meet Fenrir again.
5. An animation with Sarah and Fenrir fighting each other will start. Gigantes will appear and they're quite hard to kill, cause one of them is immune to physical damage and the other is immune to magic damage.
Just run! :?

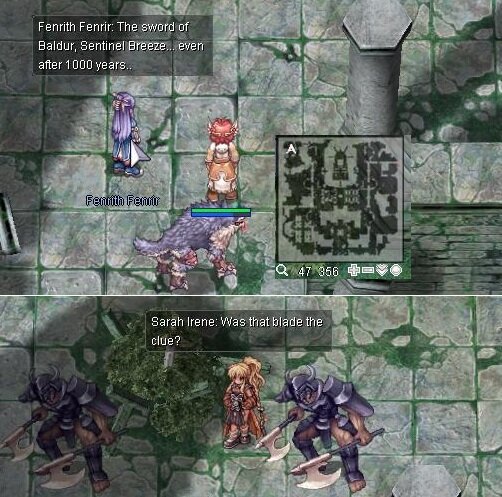
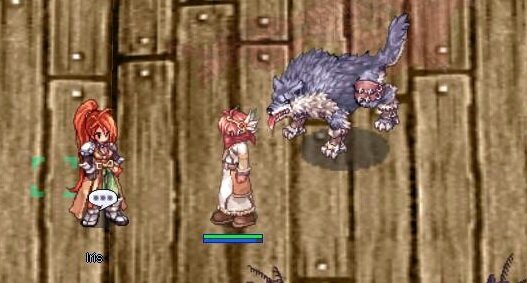
6. When will the last attack of Fenrir. You will have a chance to kill Sarah.
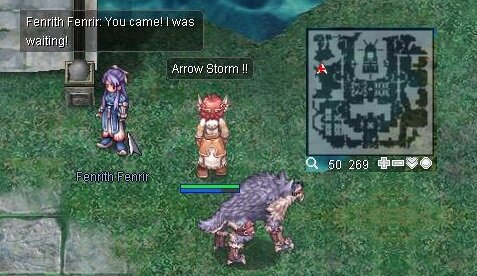
7. You will now be warped back to the center of the map.
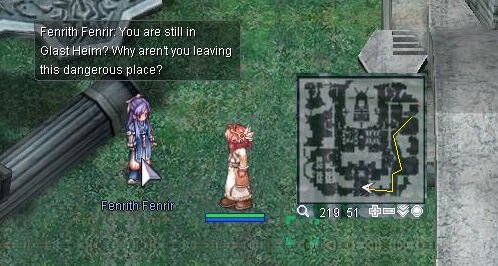
8. Talk to Fenrir.
9. You now have to escape back to the entrance.
10. Once you reach the end, Fenrir will reward you with a Yggdrasil Berry
 + Seed
  and allow you to make and enchant Sarah Earrings
 .
.

11. You can leave the instance by going into the top right portal where you spawned.
12. Talk to Professor Bernard.
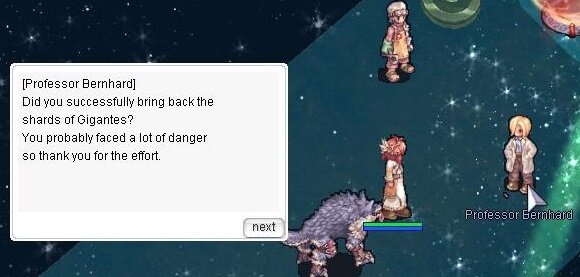
If you choose help to Professor Bernard (storyline 2):
1. There is a total of 6 Ancient Gigantes which can be found in the following locations.
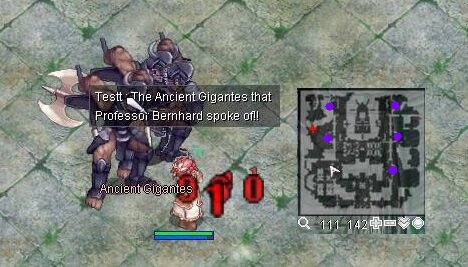
2. Killing them will drop 1 x Fragment of Gigantes
with 100% chance. These mobs can do a lot of damage and are fairly hard to kill.
3. After 5 minutes, the middle portal to enter the Castle will be active (it will be announced). Now, you have 5 minutes to decide whether you go and help Fenrir or keep killing the Gigantes.
4. You will now go back with the main storyline and need to escape, otherwise Sarah will kill you.
Monsters:
Sarah Irene (MVP)
Enchant earrings:
1. Assistant Professor will offer to sell you a new
Sarah's Left Earring or Sarah's Right Earring in exchange for 1 x Fragment of Gigantes 2. You may instead enchant an earring (of the two types that can be purchased here) you have equipped. Enchantment will cost four 4 x Fragment of Gigantes
3. You can also delete Enchant for 1 x Fragment of Gigantes

Enchant Slot 3 20% chance Slot 4 10% chance CRI or critical  Critical Rate +2, 4
Increases critical attack damage by 4%, CRIT +1
Increases critical attack damage by 6%, CRIT +2
Critical Rate +2, 4 , 6
Increases critical attack damage by 4%, CRIT +1
Increases critical attack damage by 6%, CRIT +2
Increases critical attack damage by 8%, CRIT +3
Critical Rate +2, 4
Increases critical attack damage by 4%, CRIT +1
Increases critical attack damage by 6%, CRIT +2
Critical Rate +2, 4 , 6
Increases critical attack damage by 4%, CRIT +1
Increases critical attack damage by 6%, CRIT +2
Increases critical attack damage by 8%, CRIT +3
Expert archer or Bleed  Increases long range physical attack by 2%, 4%
Perfect dodge +3, 4
Increases long range physical attack by 2%, 4%, 6%
Perfect dodge +3, 4 , 5
Increases long range physical attack by 2%, 4%
Perfect dodge +3, 4
Increases long range physical attack by 2%, 4%, 6%
Perfect dodge +3, 4 , 5
Conservation or MATK SP cost -2%, 4%
 MATK +3%, 4%
SP cost -2%, 4%, 6%
MATK +3%, 4%, 5%
MATK +3%, 4%
SP cost -2%, 4%, 6%
MATK +3%, 4%, 5%
Delay attack or Delay Skill Reduces after attack delay by +4%, 6%
Reduces after cast delay by +2%, 4%
Reduces after attack delay by +4%, 6%, 8%
Reduces after cast delay by +2%, 4%, 6%
-
1. To start this quest, you have to use the Dimensional Device located on Rune Midgard Allied Forces Post within the New World. It will warp you into the Dimensional Gap.
2. Talk to Explorer Lion and then use Dimensional Device in Dimensional Gap to start the quest.
3. Talk to all of the passengers. The conversation with Chaos, Iris, and Ferlock will advance the quest.

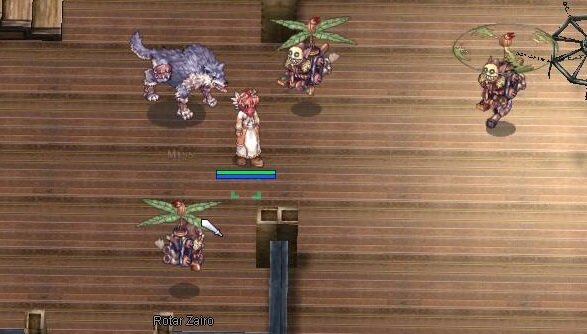
4. An attack will begin on the airship. The monsters here cannot be fought. Proceed to the lower deck (entrance on the east end of the ship). Kill all monsters on this floor (they resemble Beholder and Rotor Zairo).
5. Proceed to the next floor once the text at the top of your screen instructs you to do so. The stairs are on the east end of the ship.
Kill all monsters on this floor (they resemble Gremlin and Blue Acidus).


6. Talk to Iris on the eastern part of the ship. Iris and Chaos will disappear.
Return to the previous floor of the ship once the text at the top of your screen instructs you to do so. The stairs are on the east end of the ship.
Kill all monsters on this floor (they resemble Beholder and Gold Acidus).
7. Exit back out to the main deck once the text at the top of your screen instructs you to do so. The stairs are at the center of the ship.

8. Talk to Fenrir to start the scene.
9. Kill the Wyvern monster.
10. Talk to Iris to continue the scene. Captain Ferlock will go crazy and start shooting up the ship.
11. Subdue Captain Ferlock.

12. Talk to Chaos. This will start a scene.

13. Exit the portal at the north when it appears. Receive 500 000 Base Exp + 325 000 Job Exp.
The monsters here will drop (low chance 1-1.25%, non bubble gum and vip):
Unrefineable items! Can not be traded, only sale npc or put in kafra store.
The MVP will drop:
 Costume Ferlock's Hat 19.08.20
-
1. To start this quest, you have to use the Dimensional Device located on Rune Midgard Allied Forces Post within the New World. It will warp you into the Dimensional Gap.
An evil lord is preparing to resurrect Satan Morroc! You and the Assassin's Guild must race against time to stop him. In this instance you must defeat Evil Shadows and the Evil Believer alongside Loki. In exchange you may obtain Evil Slayer weaponry with various enchantments.
You cannot reenter this instance if you happen to exit this instance before the instance done (e.g. disconnected, died then respawn). It is suggested to bring Token of Siegfried in case you die on the middle of the instance.
All monsters in this instance are either Demon race and Shadow elemental.
2. Talk to Historian Shep, then talk to Magic Scholar Artie in Dimensional Gap to start the quest.

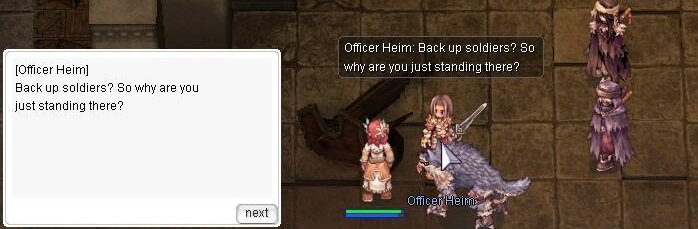
3. Once inside, the party leader should talk with Officer Heim until Healer Fama appears on the left side of the room.
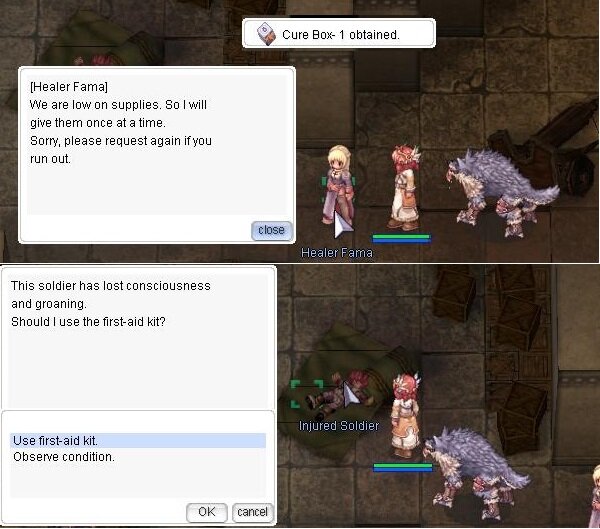
4. Talk to Healer Fama and you get a cure box
 . Then you will see injured people on the left. Talk to injured soldier, the injured person will be healed. Repeat this process for other people (if you are in party, each member can do this so it will save more time).
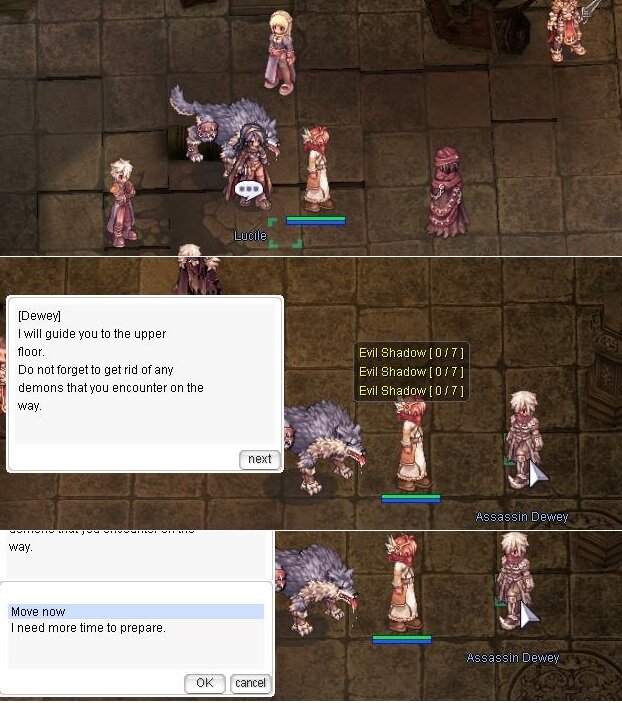
5. After all people already healed, four assassins will appear near Helar Fama. Talk to Lucille, then proceed to right, then talk to Dewey. You will be warped to a corridor.
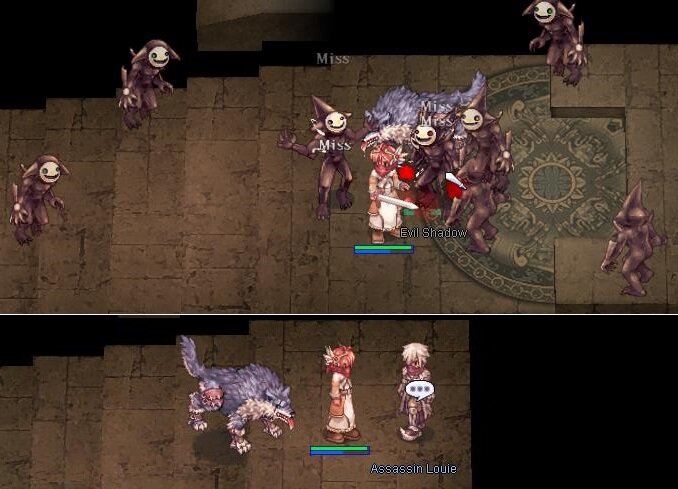
6. Defeat all the Evil Shadows that spawn in the passageway, then talk to Assassin Louie at the end to be warped to the next room.
7. Talk to Lucile on the center, you will need to activate a machine. While you're at it, mob of evil shadow will attack. Make sure to kill all of them. Once done, talk to Huey to move to next room.
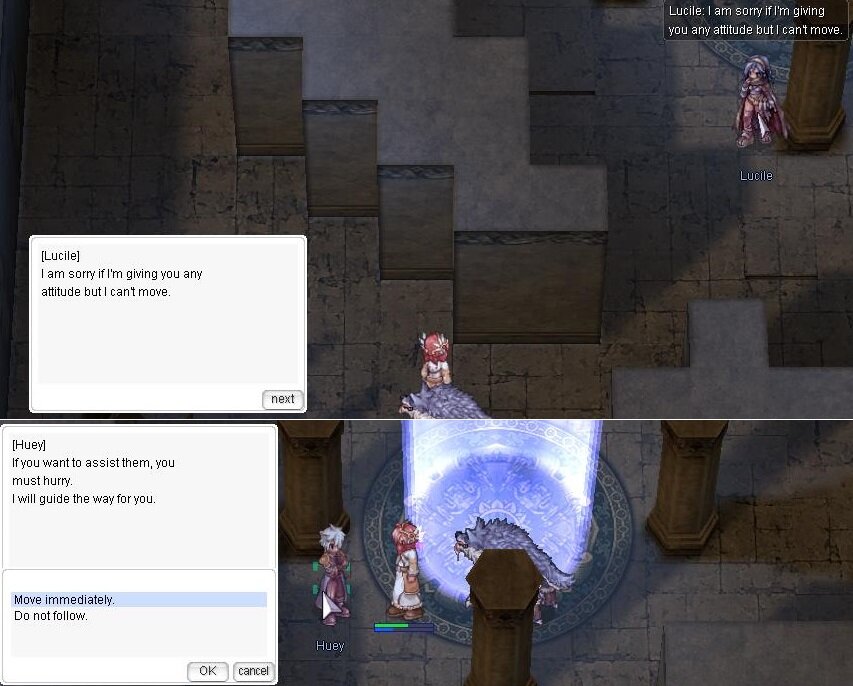
8. You will be on top of thanatos tower and you will see Thanatos is battling Satan Morocc. Talk to Lucile, and 5 x magic seals will spawn at each edges. The magic seals will summon evil shadows and will slowly move to the center. Defeat all of them before they reach the center. Once one of them defeated, the 'There are still magic seals to destroy' message will appear. Once all of them defeated, talk to Lucile and she will move you to the next room.

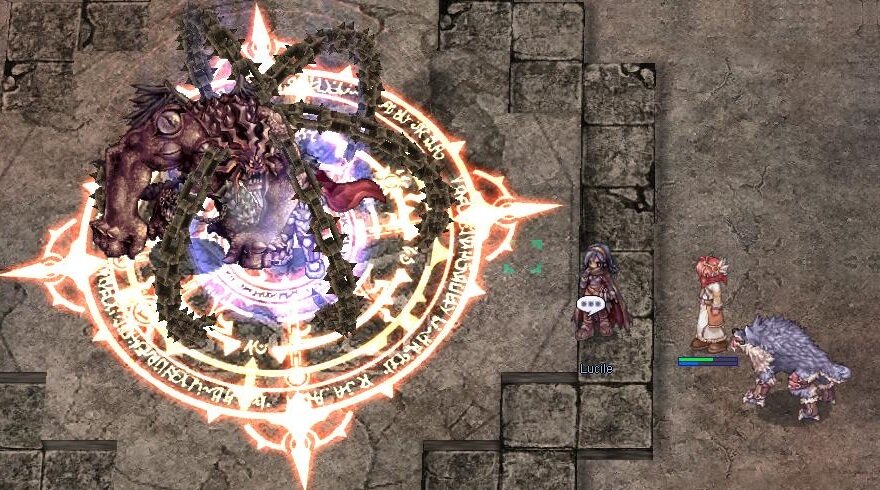
When one Magic seal reach the center and being pushed back, the phase restarted. All 5 seals will be back with full HP (even the dead one will be revived). But the Magic seals that already destroyed still count as dead even tho they are alive and advancing. No need to kill the same Magic seals twice, just focus on destroying the Magic seals that have not been destroyed earlier.
Magic Seals are formless race, neutral element and have 10m HP but when fought they only have 1-2m HP left. Magic Seals are not boss flagged, means it can be inflicted with status, polymorphed and pushed back.
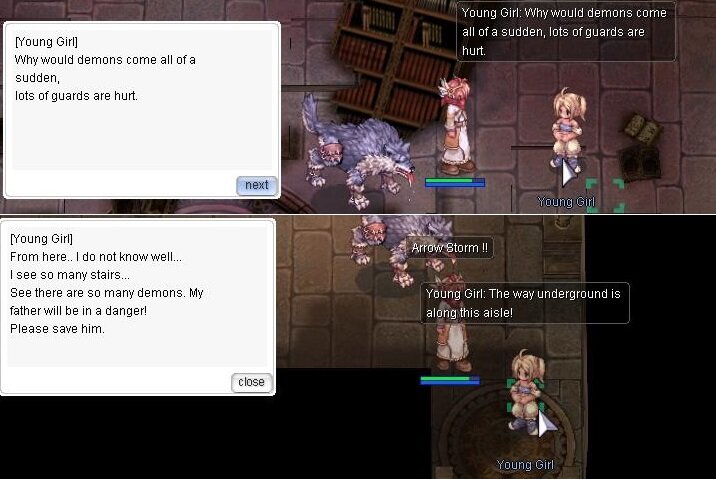
9. You will be inside a room. Kill all of evil shadows there, then talk to Young girl and a portal will appear. Go inside, then kill all of evil shadows again and a portal will appear again. Go inside, kill all of evil shadows again and move to next portal.
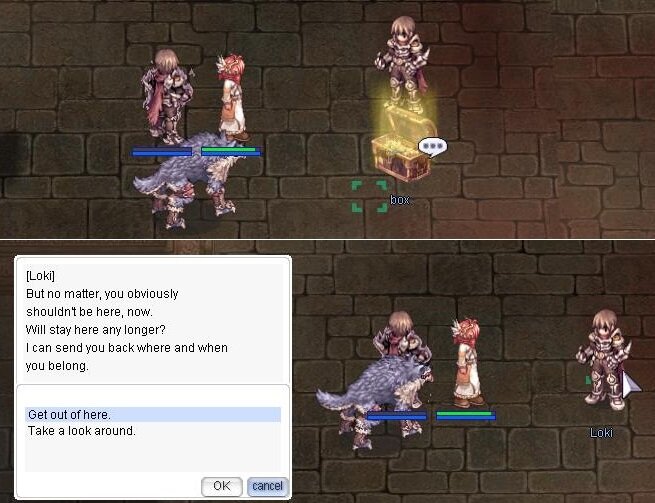
10. You will arrive in a large room. Make your way to the center and talk to Loki.
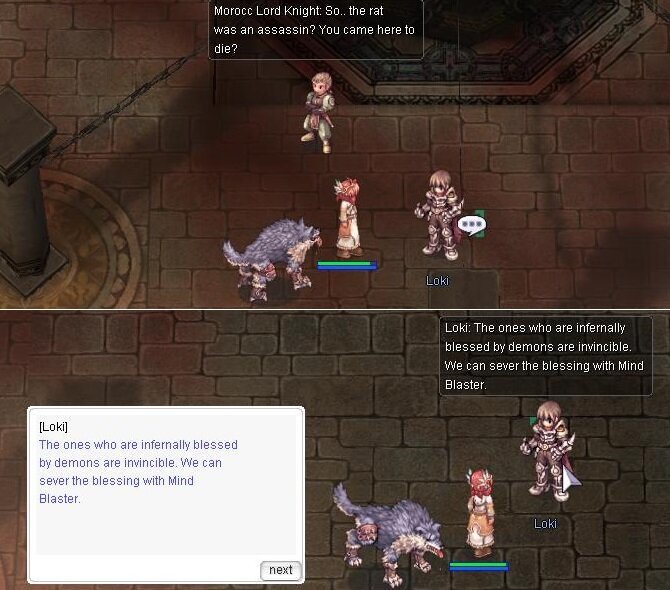
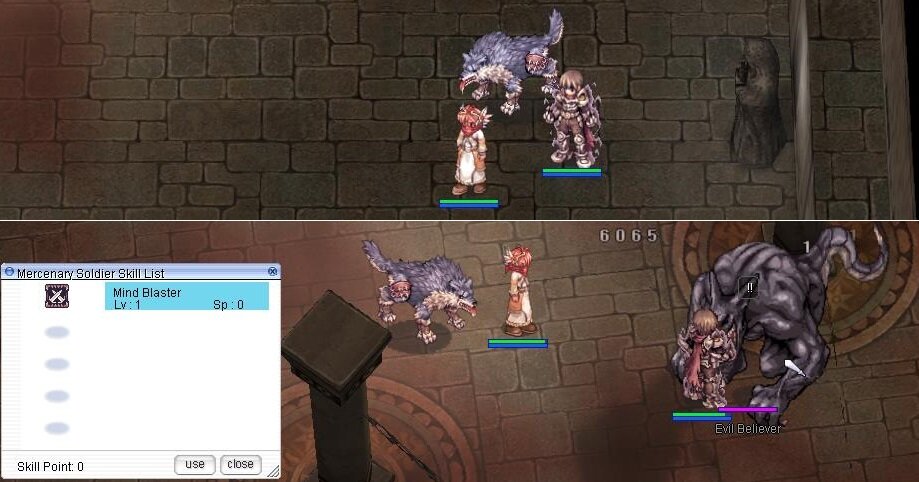
11. He will join your party as a Mercenary that will follow the party leader's command. Use CTRL + R or Right click on Loki (status) to open the Mercenary Info window and see Loki's skills. Put Loki's skill Mind Blaster on your hotkeys and use it on the Evil Believer before you begin attacking it.
Note 1. It might be best to put Loki in Standby Mode (CTRL + T) while you fight the Evil Believer. If you let Loki die at this stage, your party will fail the instance.
Note 2. An Evil believer can enter a state of invulnerability. To counter this, use the skill Mind Blaster
12. After defeating Evil Believer, talk to Loki to receive your rewards. The Evil Slayer weapon you receive will be randomized, and their upgrade level 1-6 and enchants get better the faster you finish the instance.
13. Talk to Historian Shep again to get Base exp 2 250 000 + 2 250 000 Job Exp and the cooldown timer will start.
Monsters:
Evil Believer (MVP)
Weapons:
 Evil Slayer Stabber Dagger [1]
 Evil Slayer Vanquisher Staff [1]
 Evil Slayer Destroyer Hammer [1]
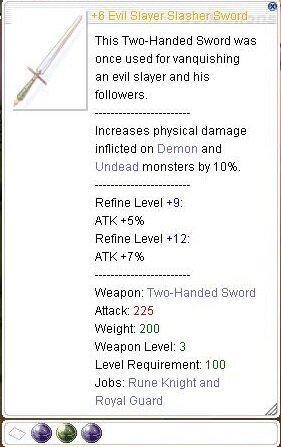
List of Known Enchants:
Enchants Slot 2,3,4 Fighting Spirit  Fighting Spirit Lv1
 Fighting Spirit Lv2
 Fighting Spirit Lv3
 Fighting Spirit Lv4
 Fighting Spirit Lv5
 Fighting Spirit Lv6
Spell  Spell Lv1
 Spell Lv2
 Spell Lv3
 Spell Lv4Spell Lv5
Def / Mdef / SP  DEF +3 /
  MDEF +2 /
  SP +50
-
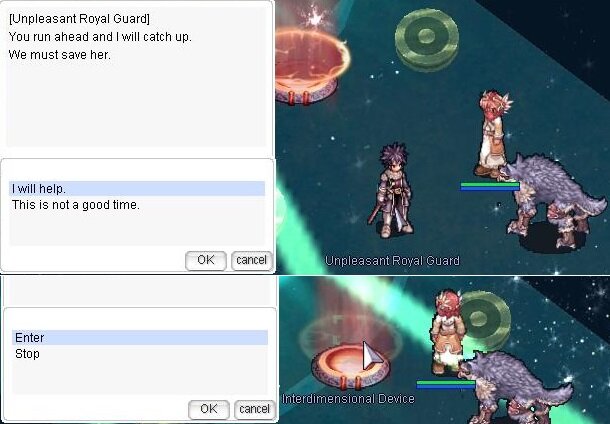
1. To start this quest, you have to use the Dimensional Device located on Rune Midgard Allied Forces Post within the New World. It will warp you into the Dimensional Gap.
2. Talk to Unpleasant Royal Guard in Dimensional Gap to start the quest.
You can not reenter this instance if you happen to exit this instance before the instance done (e.g. disconnected, died then respawn). It is suggested to bring Token of Siegfried in case you die on the middle of the instance.
All monsters in this instance are either Demon, Demi-Human or Undead (race), and have Undead, Shadow, Ghost, Wind or Earth element.
All monsters have moderate chance to drop
 Gray Shard, which is required to purchase equipments (100) and weapons (200) at the end of the instance. Some monsters like Dullahans, Dark Frames and Khalitzburgs also drop Herb of Incantation
  ( MATK+30 for 1 minute) and Distilled Fighting Spirit
  ( ATK+30 for 1 minute).
You can steal from all the monsters in the instance for extra
Gray Shards, this includes the Tortuous Redeemer.
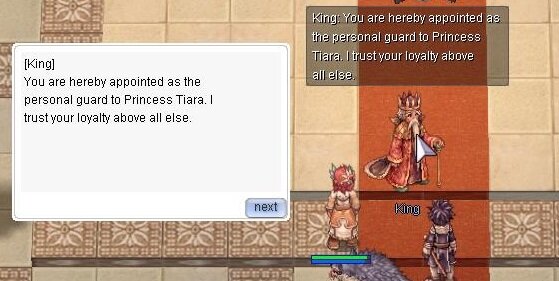
3. Talk to King to start. Kill all of those monsters to open portal to second stage.
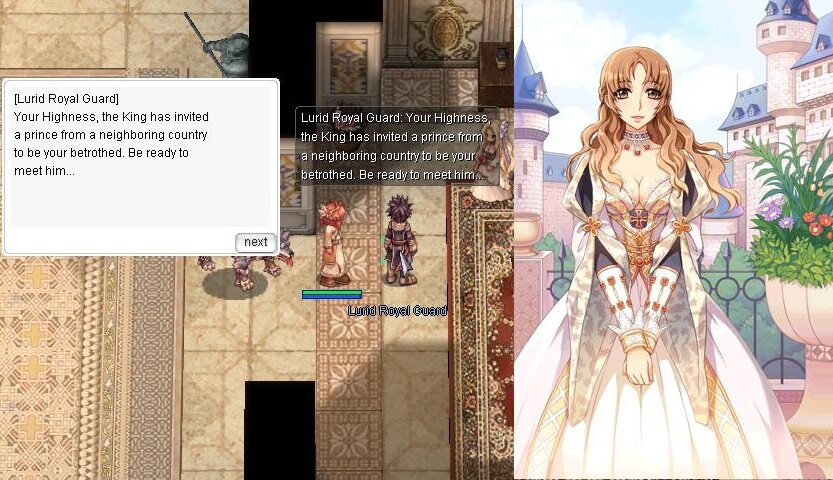
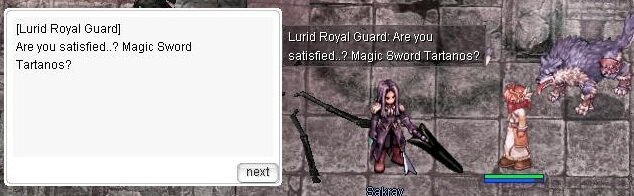
4. Talk to Lurid Royal Guard. Clear the monsters to open portal to 3rd stage.
5.Talk to King. Kill every monster on every jail chamber until announcement that the exit portal appears.
This room has the most monsters!

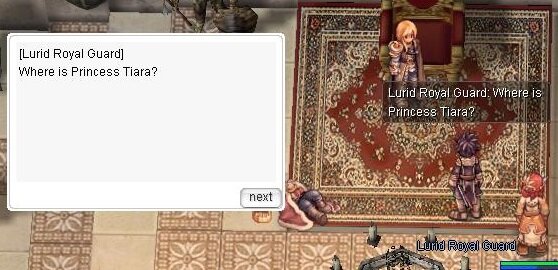
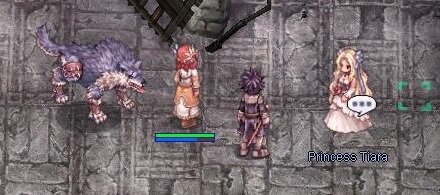
6. Talk to Lurid Royal Guard. You will see that he is the real culprit. He will transform into Torturous Redeemer. Kill the last monster to open next portal.
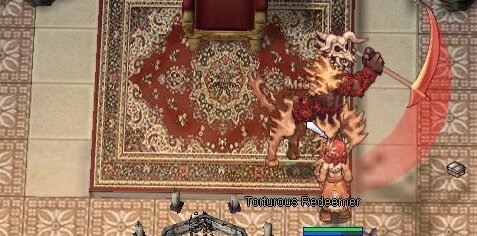
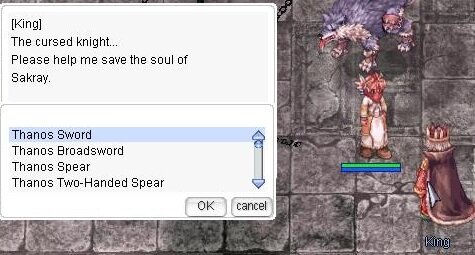
7. Talk to Princess Tiara, and you will find out that she is dying. Kill monsters in every jail chamber until another Torturous Redeemer come. No need to kill it since Sakray will do the job. Talk to Sakray. Now Sakray already changed, granted new power from Thanatos Spirit.
8. This marks the end of the instance. An exit portal will appear in south east. Before you go, you can talk to King to trade Gray Shards for Thanatos weapons and Gray equipment. Each weapon requires 200 Gray Shards
and each Gray equipment requires 100 Gray Shards .
9. When you go to exit portal, you will get 2 Gray Shards
+ 4 500 000 Base Exp + 2 500 000 Job Exp.
10.Talk to Unpleasant Royal Guard again after 23 hours to repeat the instance.
Weapons:
Equipment:
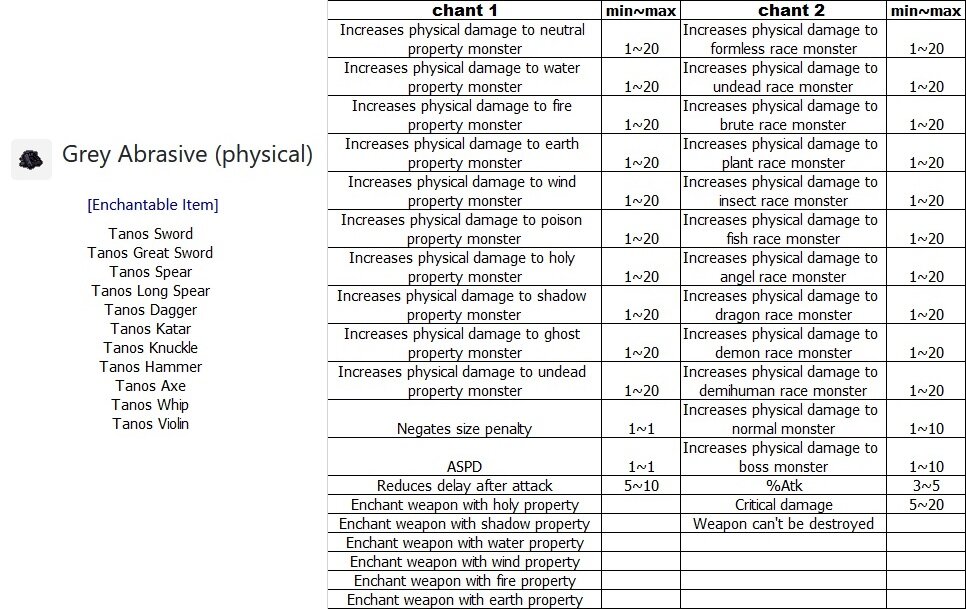
New Enchant.
To enchant a weapon, you need to buy an abrasive for the desired weapon and an enchantment option, which costs 50 x Gray Shards
.

-
1. To start this quest, you have to use the Dimensional Device located on Rune Midgard Allied Forces Post within the New World. It will warp you into the Dimensional Gap.
Note1: You can not reenter this instance if you happen to exit this instance before the instance done (e.g. disconnected, died then respawn). It is suggested to bring Token of Siegfried in case you die on the middle of the instance.
Note2: All tournament's monsters in this instance are Demi-Human only, and have Neutral, Ghost, and Earth element.
Note3: This instance dungeon can only be entered by a solo party.
Note4: Don't forget to talk to Emmitt White after exiting the instance to start the instance cooldown timer.
2. Talk to Emmitt White in Dimensi?onal Gap to start the quest.
You can get special buff. Choose one from the list !
1 - Increase physical damage Lidia
2 - Increases magic damage Fenrir, Loki

3 - Receive reduces damage Chaos, Iris Irine
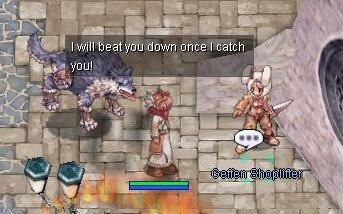
3. Talk to Receptionist in south area, you register participation of tournament. You have to kill 1 Desert Wolf within 60sec by registration examination. Talk to Receptionist again, input your character name by register.
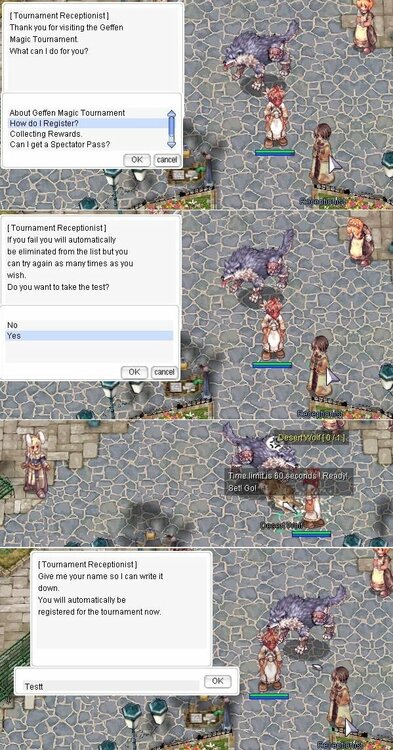
3. Go to south water fountain's warp portal, start of the tournament battle.
- Battle round has been imposed on time limit 3 min. ( Final round are 5 min)
-
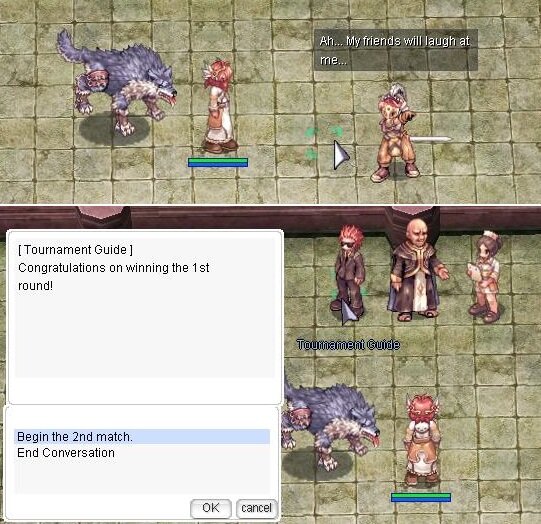
You can get a Geffen Magic Tournament Coin
 , and go to the next round if talk to Tournament Guide.
- After the tournament ends, you will be warped out from the tournament area. Talk to Fenrir's members around Geffen tower. Member will give you a random potion or Yggdrasil item.

Talk to Emmitt White again to the cooldown timer will start.
4. Monsters:
In round 3, you will face one of the three possible competitors.
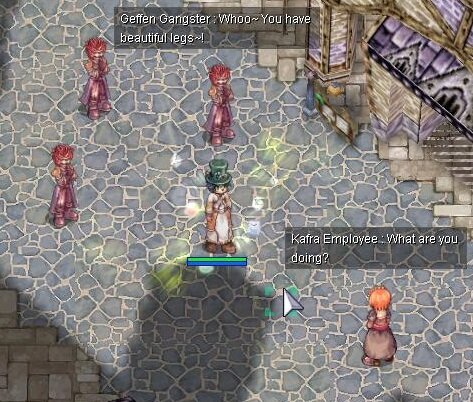
In round 12, you will face either Dwigh or Fay Kanavian and her minions.Round Monster Coins Reward
1 Arhi 1 2 Dio anemos 2 3 Geffen Shoplifter 3 3 Geffen Bully 3 Geffen Gangster 4 Faymont 4 5 Ordre 5 6 Blut Hase 6 7 Kuro Akuma 7 8 Ifodes 8 9 Licheni 9 10 Odoric 10 11 Ju 15 12 Dwigh 20 12 Fay Kanavian 12 Alphonse 12 Alphonse JR 13 Fenrir 20 5. Equipments
Item Cost Coin
900 
900 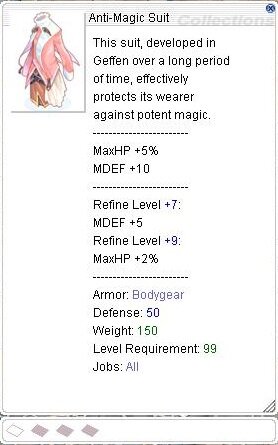
1800 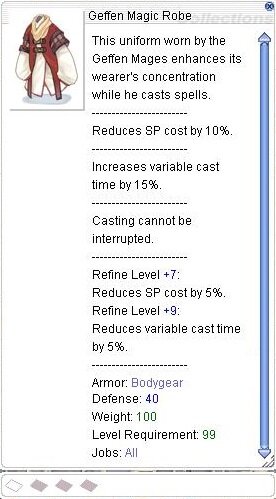
1800 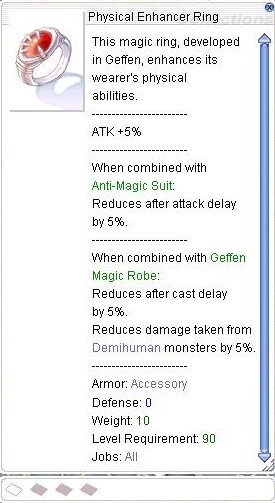
1350 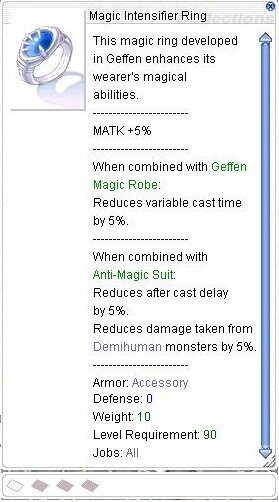
1350 6. NPC

New Enchant.
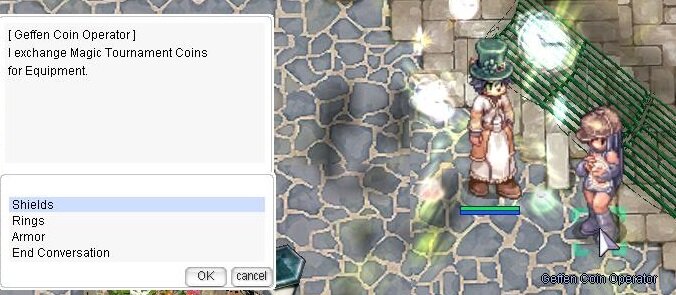
You need to buy a scroll depending on what you want to enchant (Armor or Ring) which costs 100 x coins
.
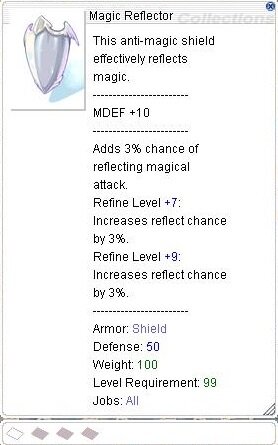
Armors: Geffen Magic Robe or Anti-magic Suit
Rings: Physical Enhancer Ring or Magic Intensifier Ring
-
1. To start this quest, you have to use the Dimensional Device located on Rune Midgard Allied Forces Post within the New World. It will warp you into the Dimensional Gap.
Faster completion time of each part will give the garment better enchant, better refine rate, and a higher chance to be a slotted one!
It can be done solo or in a party, and the difficulty may scale with the number of members in the party!
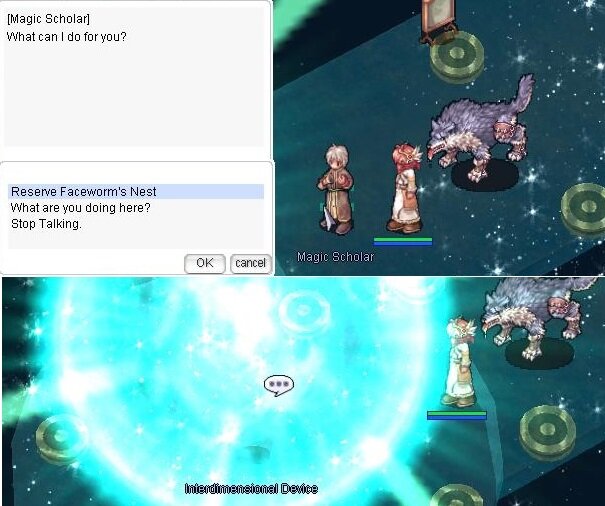
2. Talk to Magic Scholar in Dimensi?onal Gap to start the quest. Then speak to the Interdimensional Device to enter the instance.
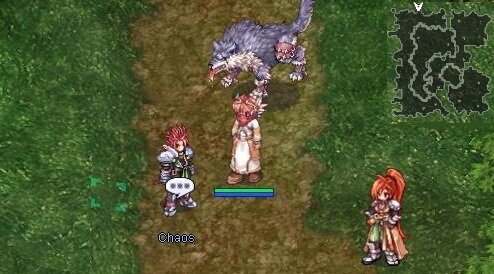
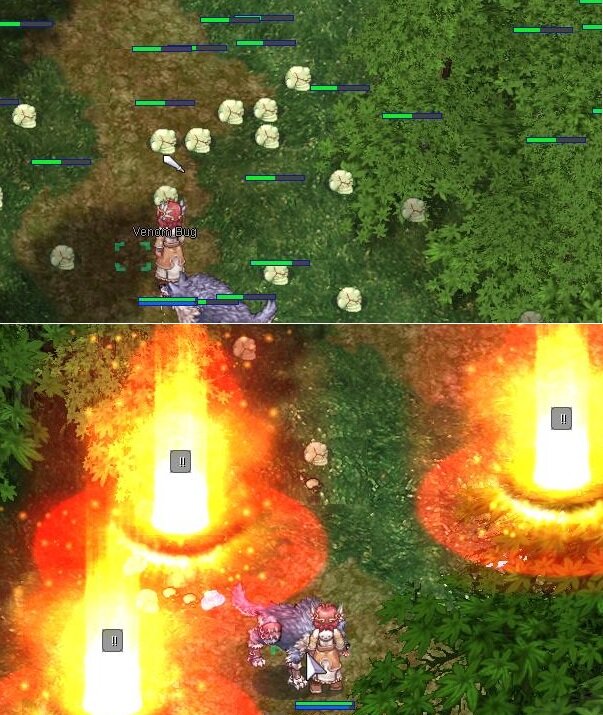
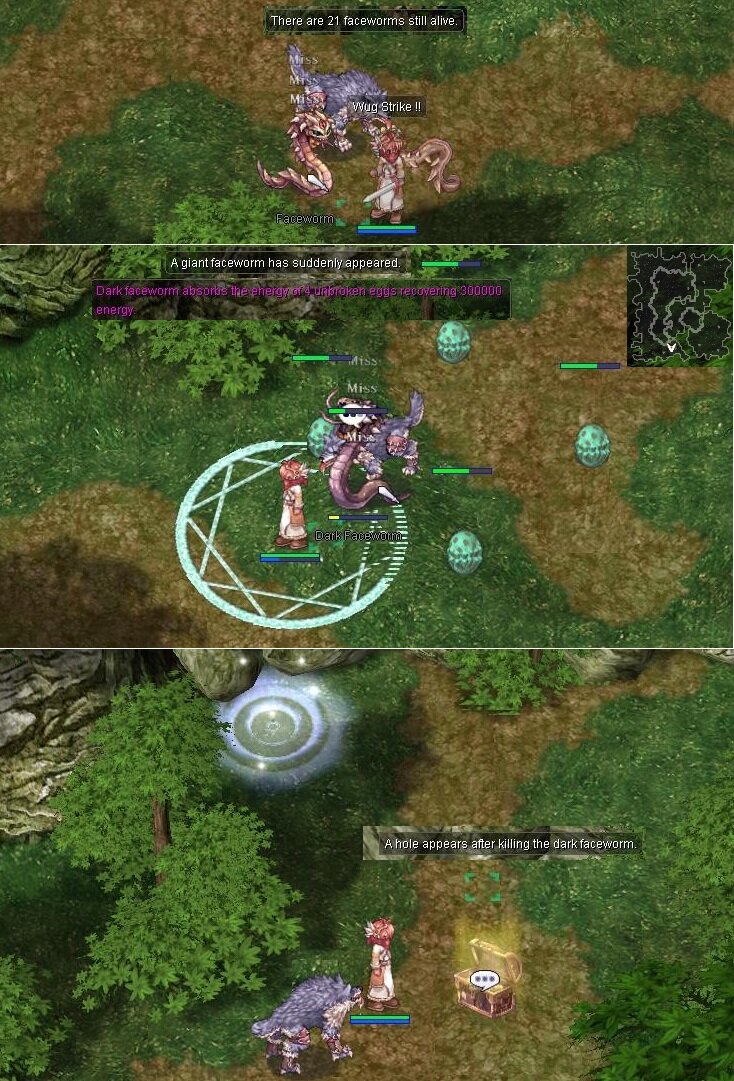
3. Once inside the instance, players will appear in a location in Payon. Heading down, Chaos and Iris can be found. Have the party leader click on them to initiate a brief conversation with the duo, and then Faceworms will spawn all around the map.
Pay attention to the broadcast messages. They will tell you where to go and what to do, and how many Faceworms are still left of the map.
Scattered around the map are Savage, Greatest General, and Beetle King, which do not need to be killed. Also present around the map are mounds of dirt. Walking near them will trigger numerous Faceworm Larva.
Part 1.
Once all Faceworms are killed, the Dark Faceworm will spawn in the bottom right of the map. Eggs will spawn near it that will have a cast bar. Once the cast bar finishes, the eggs will heal the Faceworm. Once killed, the treasure chest will appear, and the portal will open up in the bottom right area near the large rock pile where the Dark Faceworm had spawned. Proceed through the portal to enter part 2 of the instance.

Part 2.

Talk to Chaos once again. After they finished talking, Faceworms will spawn again and they will need to be killed once more.
Once all the Faceworms are killed, the Dark Faceworm will spawn in the north of the map. Also like before, there will be eggs that spawn that can heal it when their cast finishes. The Dark Faceworm can cast Water Ball, which may be mitigated by wearing water element armor. Once killed, the second treasure chest will appear and the portal to part 3 will appear. The portal is at the very south of the map, to the right of the portal that was used to enter part 2.

Part 3.

Talk to Chaos once again .
However, a high number of poison sacks will now spawn whenever players reach certain areas and they will respawn whenever players walk near. These poison sacks have a very slow timer and when they reach zero, they will explode and deals moderate damage 12500 HP, so the players should move away from them. Although the damage can be avoided with either Kyrie Eleison or Hide, standing near too many poison sacks can prove fatal if unavoided. However, the poison sacks can be killed fairly easily. Like the mounds of dirt on part 1, being invisible won't trigger the poison sacks. The narrow canyon area on the first half on this part won't have any Faceworms. Follow the path north to the large open area to find more Faceworms to kill, while also being careful of the poison sacks.
The Dark Faceworm will spawn in the north area. This time, instead of eggs, poison sacks will appear to help hinder players and heal the Dark Faceworm. Once killed, the third treasure chest will appear and the portal to part 4 will appear in the bottom right of the fourth area. Do note poison sacks will continue spawning if players approach the area so proceed to the next area with caution.

Part 4.

Still no sign of Chaos and Iris. Instead, large clouds of bubbly poison fills numerous areas of this part. Approaching the center of any of the poisons will deal continuous neutral damage at a high rate, killing players rapidly. This damage can be avoided with Land Protector, Kyrie Eleison and Hide like the poison sacks in part 3, but it is better advised to avoid walking too close to the centers. Kill all the Faceworms in this area, while being careful of the poison. Since the poisonous area can heal the Faceworms, it is advised not to fight them inside it.

The Dark Faceworm spawns in the west area this time. While also having eggs again to heal it, there will also be clouds of poison that spawn near it when fighting this Faceworm. Avoid the poison if possible while killing the beast. When this Faceworm dies, the fourth treasure chest will appear, along with the portal on the west that will lead to the final area. Beware of the poison as it will not go away.


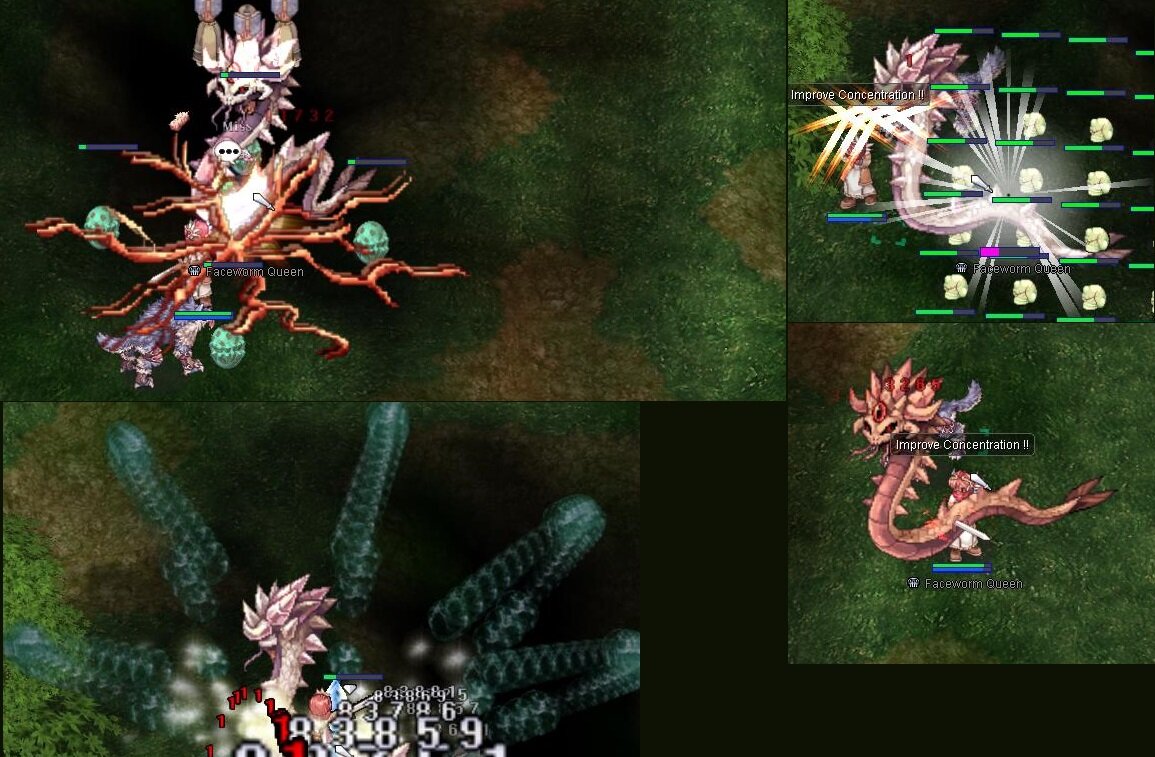
Part 5.
Chaos and Iris are here now, and once the party leader talks to them, the Faceworm Queen will soon spawn. The Faceworm Queen has an extraordinarily high amount of HP, 28m + (2m*party members number) to be exact. The Faceworm Queen proves to be a formidable foe with her high amount of HP and devastating attacks. She can cast a powerful Water Ball, Storm Gust, and even Earthquake. The Faceworm Queen will start in Poison mode, and can change her element randomly to Fire, Earth, Water, or Wind. An announcement will be shown when she does so.

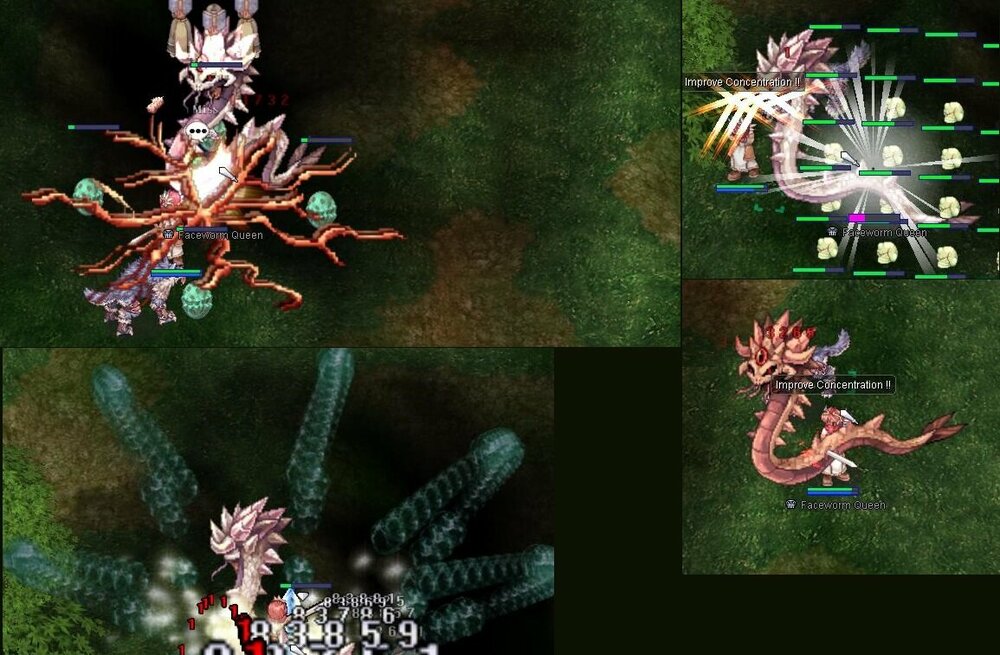
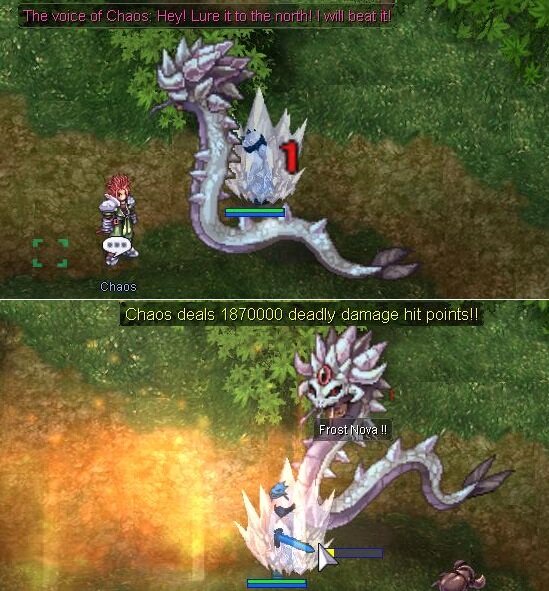
While fighting the Faceworm Queen, Chaos will tell players to move the Queen to a certain direction. Doing so will allow Chaos to deal a high amount of damage to her, helping to kill her faster. Beware of moving her too far out from the middle however, or she will become enraged. She will use everything from the previous rooms, namely the egg healing, the poison sacks, and the poison clouds. Spell Breaker can be used to interrupt her skills and deals damage to her.
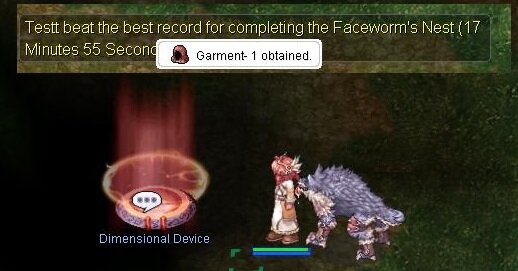
After killing the Faceworm Queen, the final treasure chest will appear, which contains two Giant Faceworm Snake Skins. A Transport Device will also spawn to allow players to head back to the Dimensional Space.
The players can now search for Merchant Prince's Box scattered through the instance, which when opened will gives various loots. The number and location of the treasure boxes is supposedly random.

Mini Boss Chest Details
Random Stats enchants 1 ~ 5 3/4 sloth
Boss Chest Details
- Random Stats enchants 1 ~ 7 3/4 sloth
- Random refined
- jewels:

-
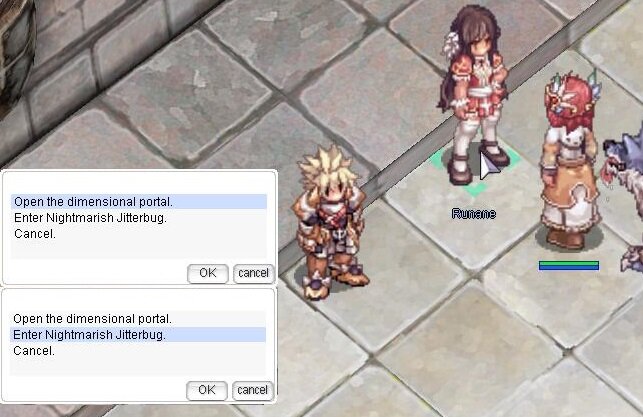
1. Lets go to Eden Group.
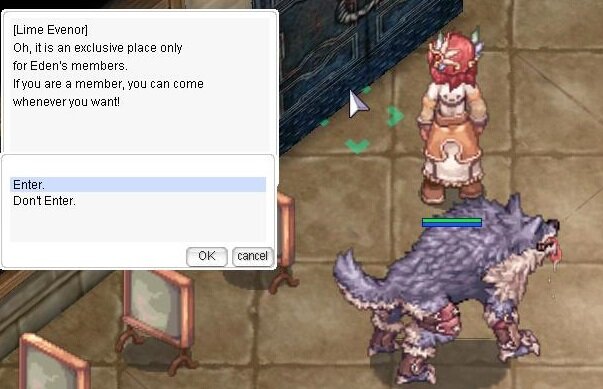
2. To start this quest, go through the decorated blue door in Eden Group Headquarters and enter the room at the left side of the corridor.
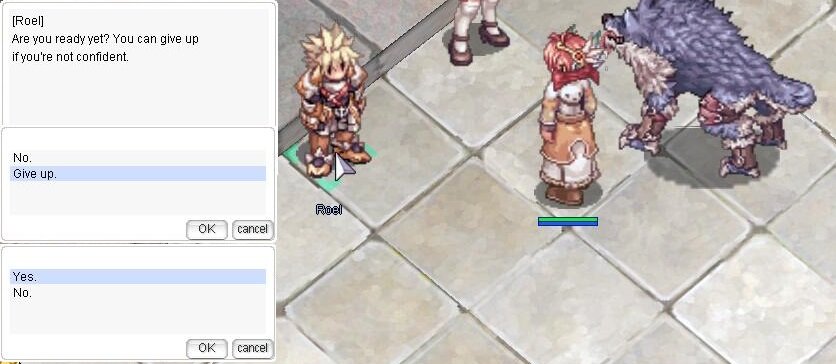
3. Talk to Roel
4. Talk to Runane to create and join the instance.
5. Once inside, the party leader will need to talk to a NPC in each room to advance to the next one.
If you've already done the instance, choosing the Hurry option will skip the dialogues and use the answers you picked from your previous run.
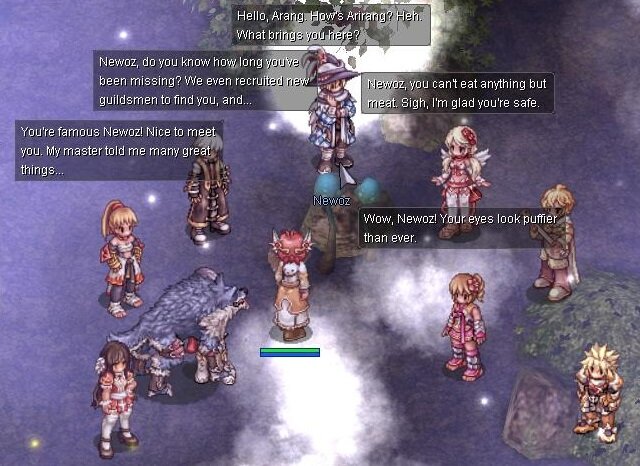
6. Talk to Newoz and a portal will appear on right wall. This instance is really straight forward. You need to go through 23 rooms (1st room and 23rd room are non-combat room). You need to clear all mobs in every room, then a NPC will appear. Talk to them and new portal advancing to the next room will be opened. There will be battle against Jitterbugs at room 9, 14, 17 and 20. And final boss, Awakened Ferre at room 22.
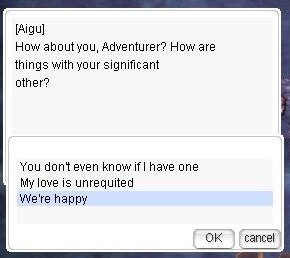
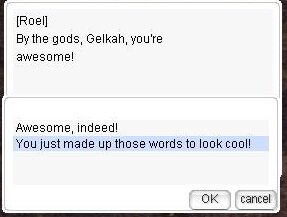
7. In some rooms, when you talk to NPC, you will be given options. These options will affect the boss encounter in the next room.
If you choose the correct answer, then there is an additional Jitterbug.

Room 8

Room 13

Room 16
Room 19
Room 20

8. At the last room talk to Newoz before leaving and an exit portal will appear.
9. If you talk to Mingmin, she will trade 50 Tooth Of Jitterbug
 for a random piece of equipment or other item:
OKA
9.1 You can also ask Mingmin to combine Pendant of Harmony and Pendant of Chaos to receive a Pendant of Maelstrom.
10. Talk to Roel and Runane again. Receive 7 500 000 Base Exp + 2 500 000 Job Exp.
Monsters:
Awakened Ferre (MVP)


 Floral Bracelet Of Aigu [1]


Privacy Policy
in Rules
Posted
We at WTR work hard to provide high quality online game experience. With so many individuals logging into and connecting through our game, we understand the importance of your privacy. Maintaining your privacy and the trust of our users is important to us. We, may store, process, your information.
What does this Privacy Policy contain?
This Privacy Policy explains how we collect, use, protect, and store your Personal Information and how we respect applicable data protection laws. Other service providers and websites, including those we may link, may have their own privacy policies. If you have questions about how other websites, services, or games handle your Personal Information, you should review their privacy policies.
By using or accessing our Services, you are consenting to this Privacy Policy.
What types of information does WTR collect?
Personal and Account Information
We may collect two types of information from you. “Personal information” is information that would allow someone to identify or contact an individual. “Account Information” is all other information and may include combined information that does not identify an individual, but may be associated with an individual’s user account. We use this information for internal purposes like improving the site or customizing content.
Examples of Personal Information:
Email address
IP address
Examples of Account Information:
Where does WTR collect Personal Information?
You provide Personal Information directly to us through the Services, for example when you:
Third Parties
We also may receive Personal Information from or through a third-party service. We abide by this Privacy Policy when we use Personal Information provided to us by third parties. We do not control the information that third parties collect or how they use that information. You should review the third parties' privacy policies for more information about how they collect, use, and share this information including what information they may disclose to us.
Why does WTR collect Personal Information?
Lawful Basis
We only collect, use, or store your Personal Information if:
We may need, and may require from you, certain Personal Information to provide our Services to you or to complete a transaction. You understand and accept that we will collect, use, and store your Personal Information based on the business purpose of fulfilling your requests and maintaining records of our Services to you. If you do not provide the Personal Information we need, we will not be able to process the transaction or provide the requested Service. We may also use Account Information related to your profile to detect cheating, fraud, illegal activity, or other activities that may violate our User Agreement.
We use the information we collect to learn what you like, tailor your experience accordingly, and to improve our websites and our other products. We may also use your Personal Information in an aggregate, anonymized way to help us target advertising on social media.
With whom does WTR share Personal Information?
Fraud detection and management services, authentication services
We do not sell or share Personal Information with third parties for those third parties’ direct marketing purposes.
We may disclose your Personal Information to law enforcement or other appropriate third parties in connection with criminal, fraud, infringement, other investigations related to suspected illegal activities, as may be required by applicable law.
We sometimes share information about our user base with third parties. Except as described in this Privacy Policy, we will not give any of your Personal Information to any third party without your express approval.
Third Party Precautions
We take reasonable precautions before sharing your Personal Information with third parties and require that they provide adequate protections.
If third parties are collecting, using, or storing your Personal Information on our behalf, we require that they have a legitimate basis for doing so, reasonably limit their retention and use, and use appropriate security measures regarding your Personal Information.
While we review the privacy and security policies of the third parties we work with, some third parties may provide additional terms in their privacy policies, which may control their use and storage of your Personal Information.
How does WTR protect Personal Information?
We only keep your Personal Information for as long as we need it, unless you agreed to allow us to use it for some other purpose or to comply with any statutory, regulatory, or business obligations. We respect requests to stop processing your Personal Information. This includes keepin a record of your stop processing request indefinitely so that we can respect your request in future.
We use all reasonable methods to keep the Personal Information we collect and use in a secure environment, and we have implemented technical, administrative, and physical security measures that are designed to protect Personal Information from unauthorized access, disclosure, use, and modification. As part of our privacy compliance processes we review these security procedures regularly to consider new technology and methods.
Your Practices and Activities
You can take certain steps to help protect your Personal Information, such as being careful what you post in public places.
Do not use your real name when selecting a username. Your username will be available to the internet's general public while you participate in some Services, like forums, chat rooms, or message boards, so you should exercise discretion when using these Services.
Do not post your real name through the Services, and never tell anyone online anything private about yourself, including your phone number or address. Use usernames and not real names at all times.
We store the information you post in the WTR Server, but we do not actively collect Personal Information from the content of these communications. When you communicate through a WTR Server, even privately, we process and store those communications on our servers. We have the ability to monitor, and you consent to the monitoring of, the communications that you send and receive. Many types of communications are also publically available. We have no control over what third parties do with the content of communications. You agree that we have no responsibility, liability, or obligation to you regarding third parties' use. Communications are exempt from the application of this Privacy Policy.
To the extent that you are able to and do create a public profile that may be available to others on our WTR Server, you are solely responsible for its content and accuracy at all times.
What rights do you have to your Personal Information?
Right to Access, Correct, Delete
In some cases, you can review or update your Personal Information stored with WTR by accessing your account online ( Contact the project administration ). You may also request that we delete your Personal Information. If you choose to have your Personal Information removed from our active databases, we will do so within a reasonable time after your request and we will take reasonable steps to ensure that your Personal Information is not used (except as may be required by law) by WTR after you request such removal or deletion.
How does WTR use cookies?
When you visit a website, it may ask your browser to store a “cookie” on your device to remember information about you, such as your language preference or login information. We and our third party providers use cookies to assign a unique number that automatically identifies your computer when you visit our websites. Some cookies remain on your computer until you delete them; others, like session ID cookies, expire when you close your browser.
We use cookies for the following purposes:
Purpose:
Assisting you in navigating or displaying certain types of content;
Assisting you in registration to our events, logging in, and your ability to provide feedback;
Analyzing your use of our Services, counting visits, collecting aggregated user data, and traffic sources;
Browser Settings
You may set your browser setting to attempt to reject the cookies and tracking identifiers, and you may still use our websites. However, you may be limited in some areas of our websites, or you may have to enter passwords or identifying information more than once.
How will WTR notify users of changes to this Privacy Policy?
WTR reserves the right to change this Privacy Policy at any time by notifying registered users via email of the existence of a new Privacy Policy, providing a pop-up notice on the Services, posting the new policy on the websites, or any other notification method. All changes to the Privacy Policy will be effective when posted, and your continued use of any of the Services after the posting will constitute your acceptance of, and agreement to be bound by, those changes.
How can someone contact WTR?
1. Email admin@worldtreero.com
2. Support Chat
3. Forum private message
4. #support channel on game